


Progress! Backyard Reno
Last time I shared with y’all I was fresh into redoing the backyard, so excited about the possibilities. It’s been a month and a half and until this weekend the project hadn’t gone any further.

Luckily the stars aligned and I had the energy AND the time. I told Sr. that all I wanted for my birthday was the materials to bring my vision to life (and his truck to haul it all 🤣).
We’re in the middle of football and softball season so Saturdays are just about the only day we have free so this past Saturday we got to work. Brian and Ella even HELPED!

Two loads of topsoil later and we’ve got a pretty good, level base for the pea gravel. The two railroad ties from the existing garden bed, of which we removed 4-5 feet in July ended up being great borders for the two sides. These are only temporary –Sr. thinks the ties are yellow jacket magnets and wants to get rid of all of them down the road. I used rock from a pathway I removed in the front gardens to round out the corner between the two ties. This matches the layered rock corners found elsewhere around the house gardens.

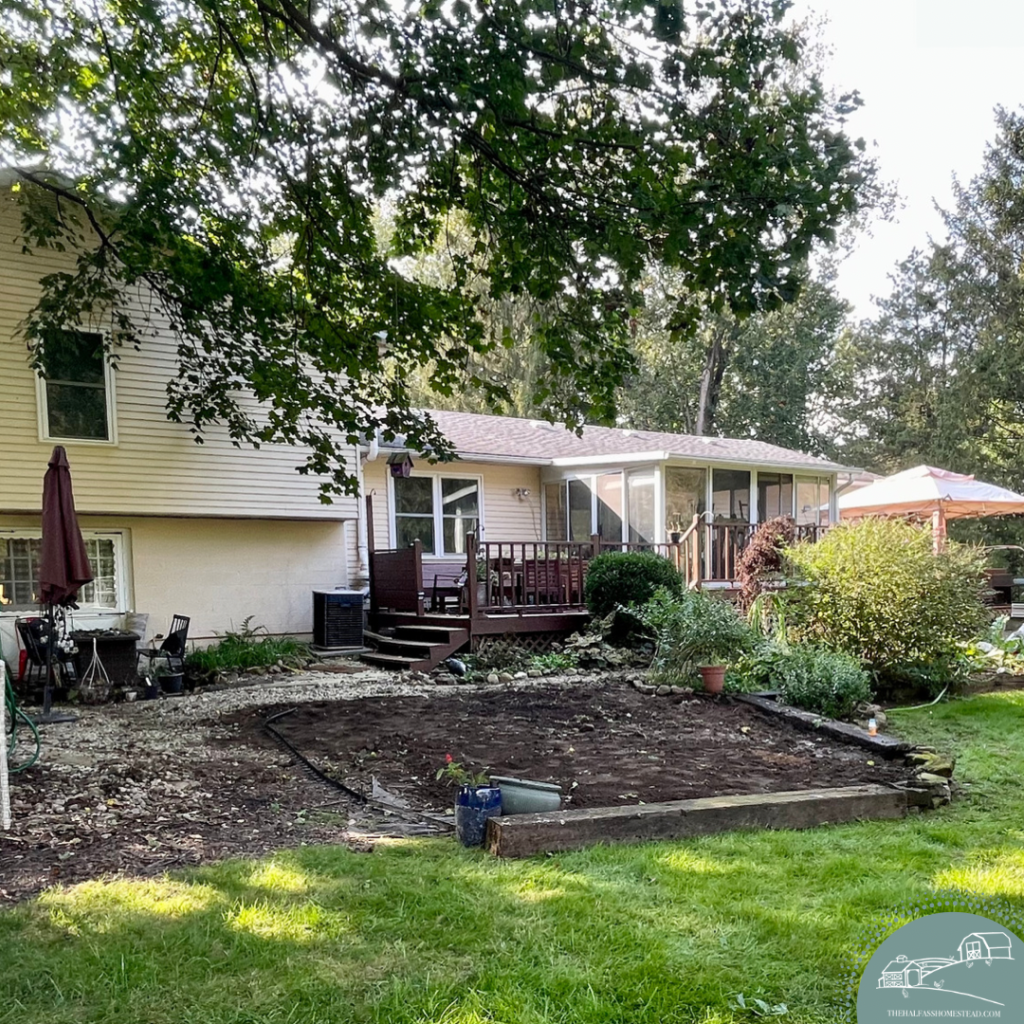
We also decided to move the azalea, opening up the space even more–another 3-4 feet. This was my brother Josh’s brilliant idea! We moved it to the little outside corner of the space and added some rocks. The larger space now has me thinking we could open the stairs up more on the corner to further connect the space!


Next up, I’ll dig a trench to fix a standing water issue at the patio and divert it downhill, add landscape fabric, and then pea gravel and done! I’m hoping I can get to it all by this weekend. 🤞🏻🤞🏻

Lately on the Homestead: Backyard Reno
Last summer, despite Sr.’s disapproval, I put a pool up. He was against the idea for two reasons
1. He’s not a fan of pools(unless there’s a slide going into the pool, he doesn’t see the point) and thinks they attract mosquitos. 🙄
2. He thought I’d ruin the grass.
While it didn’t attack mosquitos, the pool was more trouble than it was worth, and, given all the sand I put down to level the spot for the pool, I ruined the grass. 😬

But with failure comes opportunity!
So now I’m working on a renovation of the “old” pool area by opening the space up and adding a dining and firepit area. Before I get into the details of my vision and progress so far, here are a few other reasons why I’m making a change:
- It’s significantly cooler it was under the shade of that big oak tree than in the shade of our gazebo on the other side of the porch.
- During our mothers day cookout, I became frustrated with how segregated the two dining areas were–with the sunroom between the two spaces it can be hard to monitor the kids (if they are on the other side) or have a conversation with the rest of the party.
- I never really liked the table that came with the sectional under the gazebo–I prefer that sectional to be a sitting space.
- The walkout patio has always been too small to be functional for us but I’d prefer to use that door more for coming in and out, especially after sledding in the winter when we need to head straight to the laundry room to remove our wet clothes and set them to dry (the laundry room is directly to the right of the walkout). Currently, we use the sunroom or garage entrance and then have to walk through the main floor and down to the living room to access the laundry.
- The brickwork at the end of the patio also collected water after rains, which needs to be addressed. It’s not causing damage, it just annoys me.
- I needed another project to fill the time that I don’t have this summer 🤣
Alright, so what’s the plan? So glad you asked!
Cue vision board!
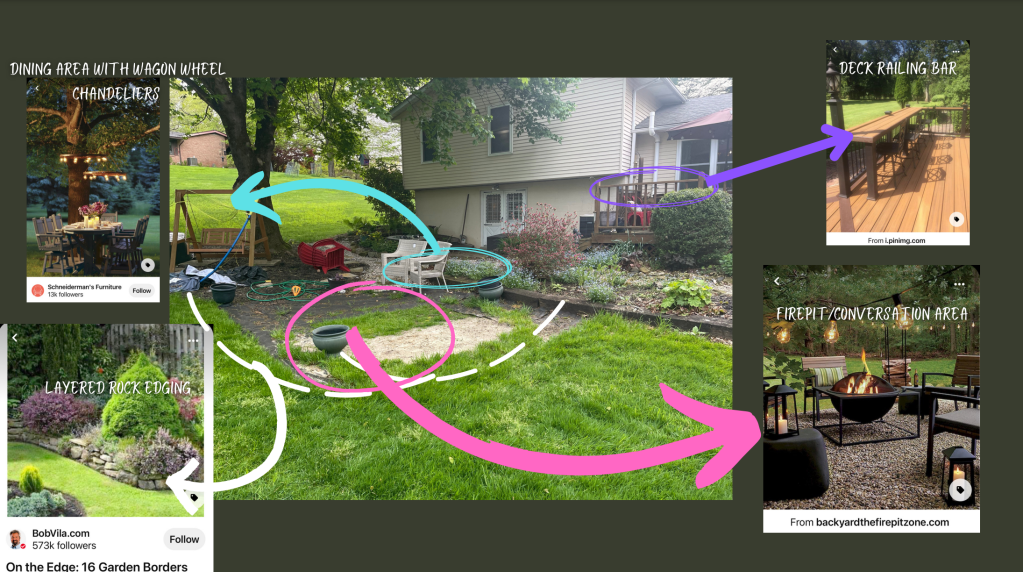
Okay, so the plan is to remove a portion of the existing border gardens to open the space for an easier flow to the new conversation/firepit area and add a dining space behind it. Oh, and those wagon wheel chandeliers, hoping to get some old wheels from the family ranch back in Texas. We almost came home with a few in June but they were much heavier than I anticipated.
All this new space will be filled with pea gravel… primarily because it’s inexpensive and I’m too half-assy to do anything more legit.
I’ll also be fixing the pooling water at the edge of the walkout patio.
And since there is a bit of a grade to the lawn (the area under the tree and where the bench swing is higher than the lawn space in front of the patio), I’ll build up the new space to the height of the railroad ties using a layered rock border so it can taper off as it goes uphill.
We’ve already begun working on the space–removing portions of the existing garden beds and moving some of the river rock to expand/define the pathway.

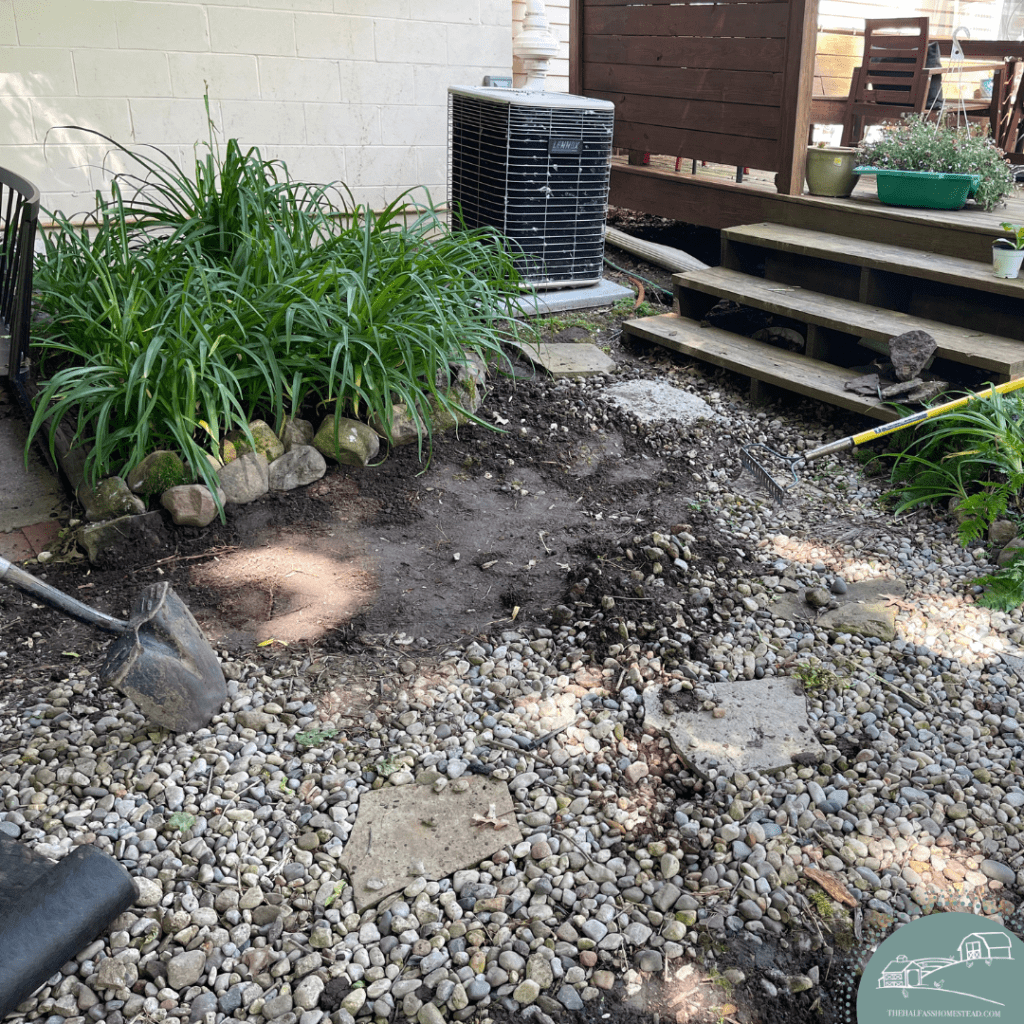
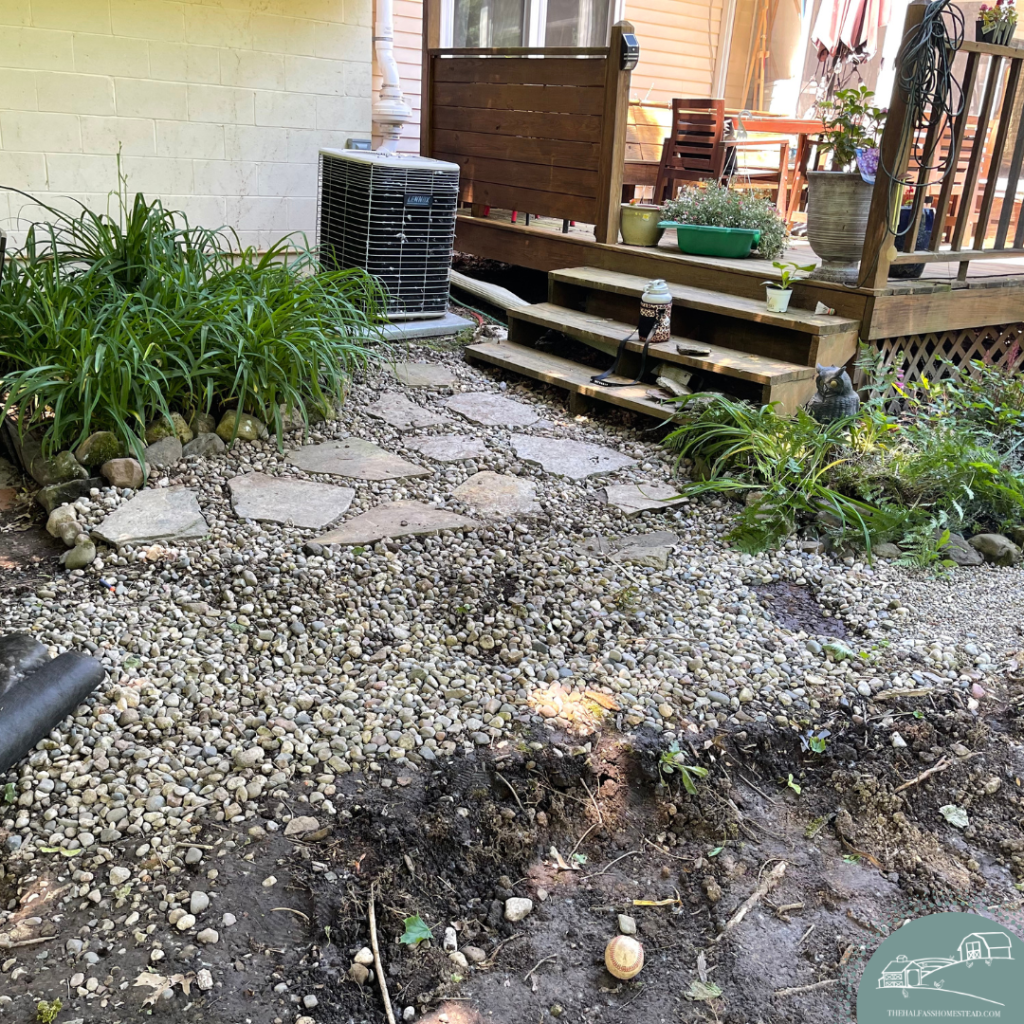


Heat and a busy schedule (and a baby) have kept me from making much more progress in the last month but I’m hoping to complete the space before the end of fall so we can make some good nights by the fire happen before winter!
On the homestead today
It’s cool and cloudy here so I’m in the gardens getting dirty—planting new plants and taming old ones.
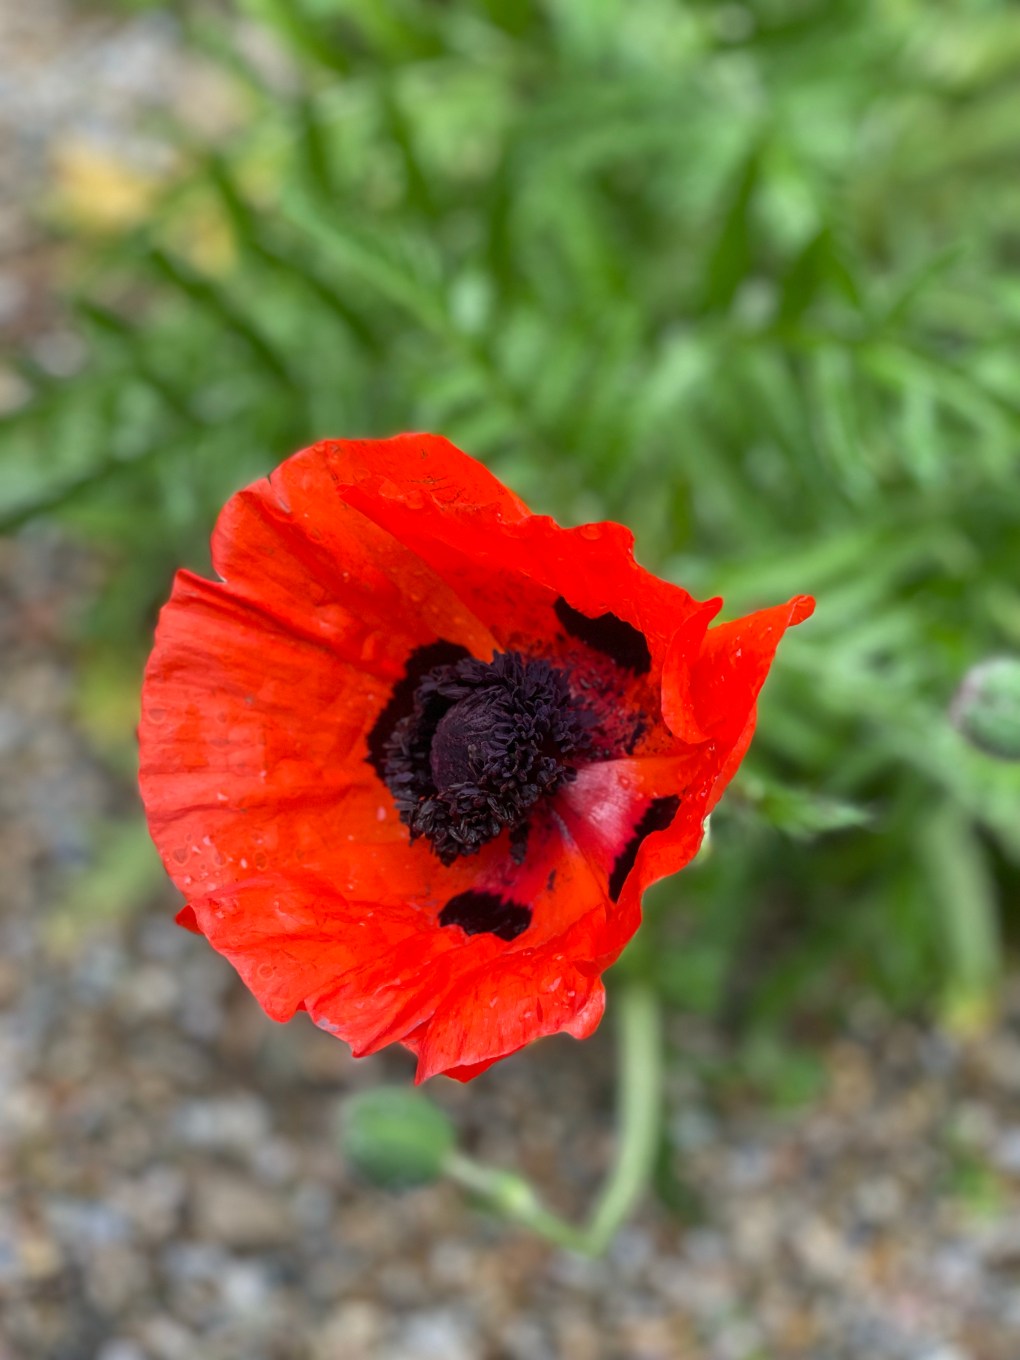
4 years ago there were just 3 poppies on this plant, look how many this year! It’s my favorite plant and blooms around Memorial Day each year.


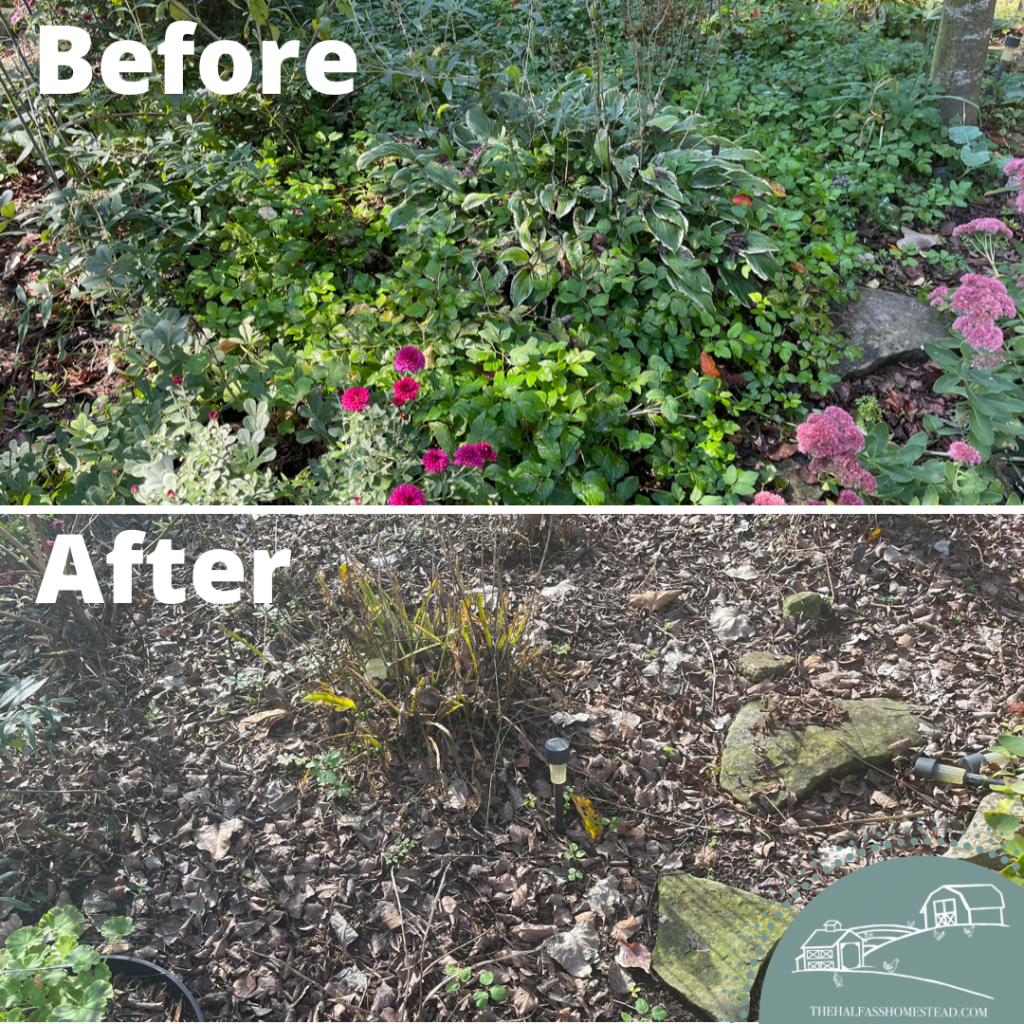
At War with Mother-in-Law’s Revenge
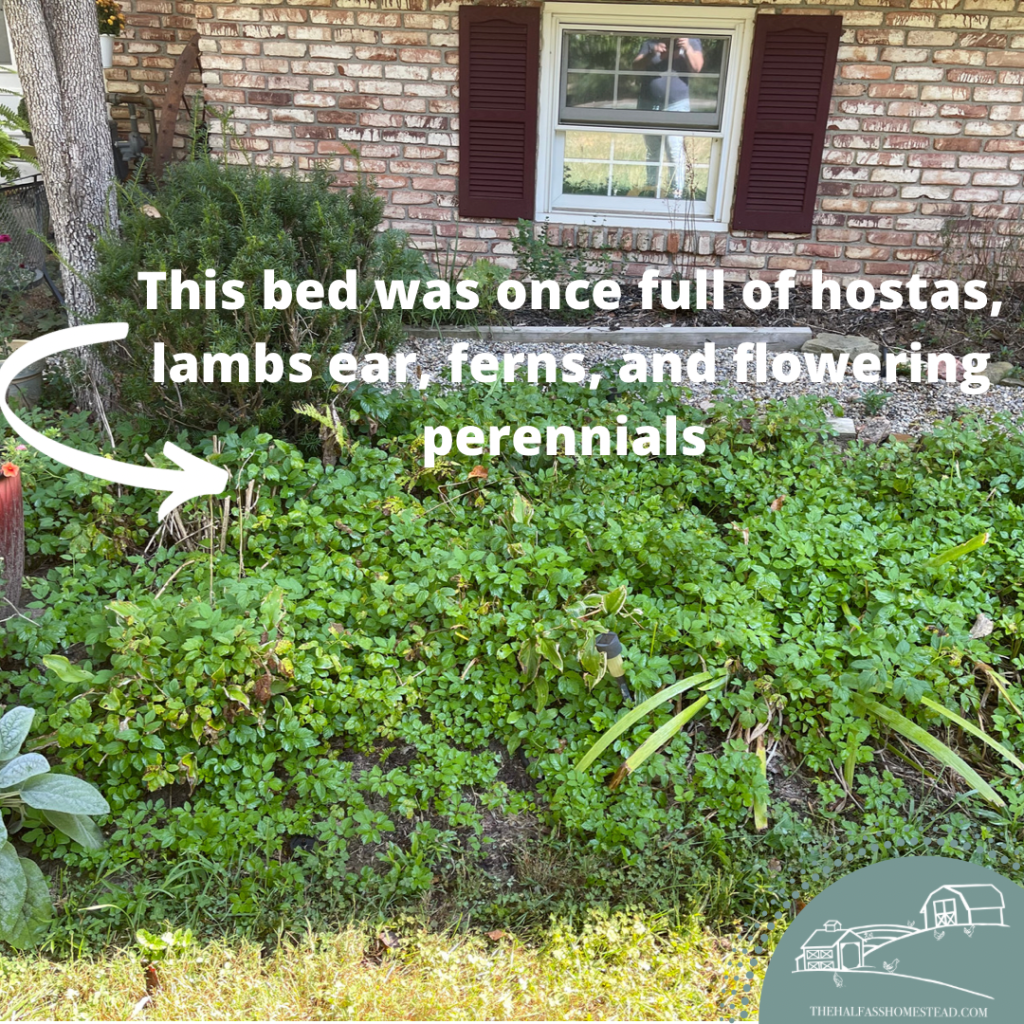
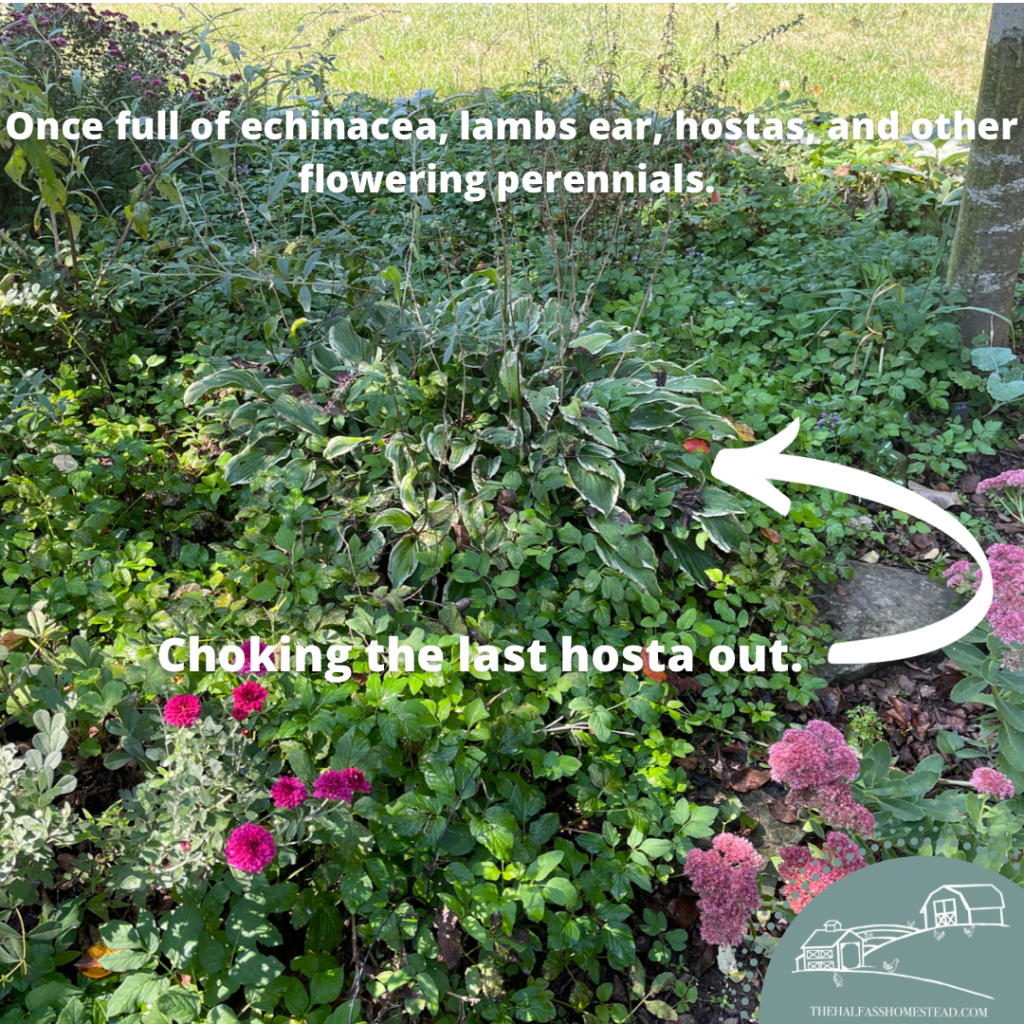
When we first moved in, Kay, the previous homeowner, came to pick up some mail and offered some gardening tips on how to care for all the beautiful perennials she planted in her 40 years in the home. One of the first things she said was that I needed to pull the “mother-in-law’s revenge” early and often.
What’s mother-in-law’s revenge, you ask? Well, Kay didn’t really know what it was but she named this formidable garden invader after her mother-in-law gifted Kay a few seedlings for her garden claiming they’d be the perfect filler and ground cover for her beautiful front gardens. Kay’s mother-in-law passed shortly after she planted them and said they’ve been haunting her gardens ever since. The seedlings quickly multiplied and choked out many of her strongest plants. She’s been pulling them from her garden–and cursing her mother-in-law–every year since.
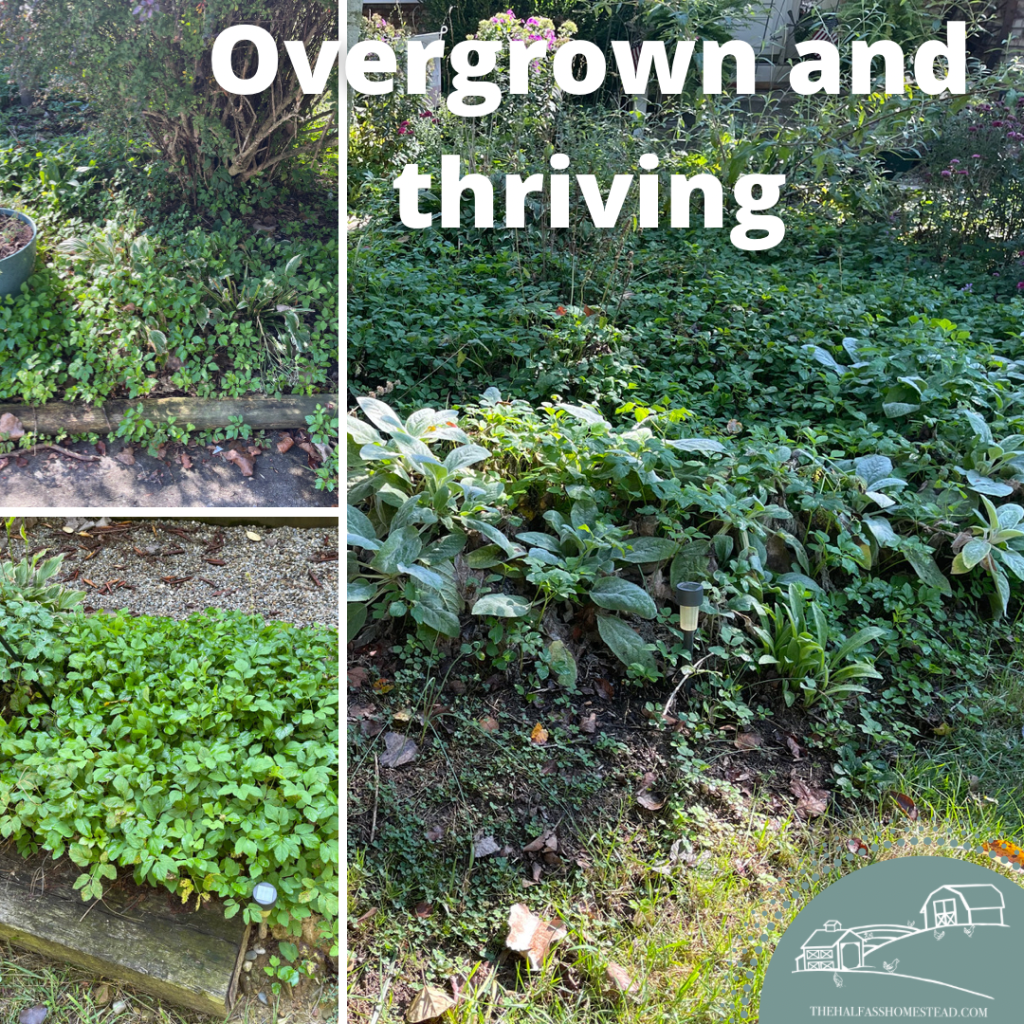
Since making this our home and taking over the gardens, I too now curse Kay’s mother-in-law every time I have to weed it out of the gardens. It doesn’t just cover the open, available real estate on the ground, it likes to hide in the middle of other plants–like my hostas, chrysanthemums, and russian sage–making finding them early and pulling a bitch. And despite my best back-breaking, weed-pulling efforts, it seems to come back with more vehemence each time. I’m telling y’all this stuff could flourish in a vat of bleach with no light.
Finally, I did some research last year and discovered the real name of this pest–goutweed. Goutweed is an extremely aggressive, invasive perennial. Savvy Gardening calls it the “cockroach of the botanical world” and “a beast to eradicate”. While on the prohibited or restricted plant list in some states, goutweed can be found in some garden centers under the name of “bishop’s-weed” or even “snow-on-the-mountian”.
Turns out, Kay’s approach of pulling the plant, which often comes up fairly easily, is one of the worst things you can do! Goutweed stems from a web of rhizomes which branch far and wide underground. You see, rhizomes have a nasty habit of multiplying from broken or left behind roots in the ground–like when you pluck gray a hair and five more emerge, thriving and taunting you.
So how do you get rid of it? It’s a painstaking process. Many sites recommend fully covering it with plastic, essentially “cooking” the devil which can take anywhere from 8 weeks to 2 whole seasons. You can also smother it by cutting it down and covering it with cardboard and mulch – 2-3 feet beyond the menace’s prersence. Another option is spraying it down with a vinegar solution or even chemical-based weed killer like Round-up.
My initial plan was to try the smother and cover method. I figured I could cover around some existing plants and add good soil above, building up the gardens and planting new perennials which would look better in the front of the house than black plastic. Besides, I had PLENTY of cardboard thanks to Amazon and Christmas time which I stored for several months. Unfortunately, when we prepared for hosting my sister-in-law’s engagement party in May, Sr. wanted the garage clean and recycled all my cardboard. To be fair, I caved and gave him permission.
June is always a busy month at work and difficult for me to get in the gardens and then I was out of comission for several months with nausea in my first trimester. By the time I got back to life–and the gardens–in September, mother-in-law’s revenge had ravaged the front gardens.
Exhausted and over it, I’m not ashamed to say I finally caved and turned to the chemicals. After all, this was war. I came to terms with the fact that there’d be some casualties, like my russian sage, mums, and a few other perennials. After the first careful spray, I was disappointed that the beast didn’t begin to wither within hours. I had totally imagined a scene out of The Wizard of Oz when Dorothy douses the Wicked Witch with water and finally ends her reign of terror.
No such luck. However, after a few weeks a difference could be seen. AND my chrysanthemums didn’t die! Two more rounds of spraying and I’ve made a serious dent in the rein of Kay’s Mother-in-law’s revenge.


Unfortunately, the arrival of the cold weather has stalled my progress because the chemical sprays are recommended for using weather above 60 degrees. Looks like there will be more work in the spring. I’m thinking I may need to srpay again a time or two and then will likely cover with cardboard and fresh soil so I can plant a few new beauties. This will allow the new plants to thrive while the chemicals dissipate under the decomposing cardboard barrier.
I also haven’t touched the bed of hostas in front of the kitchen bay window yet but I plan to smother and cover that small bed. With my Japanese Maple in that bed, I don’t want to use any chemicals. Besides, the hostas are overgrown and can’t be divided because they’re infested with goutweed so removal or covering is the best option. I’ll cover it this winter and it’ll be fun to design a new perennial bed there in the spring–something that doesn’t have hostas maybe?
It’s been a while
So much to catch y’all up on!!
It’s been a few weeks since the constant nausea of my first trimester subsided–praise the Lord! Since then, I’ve been trying to catch back up to life and all the things around the house and gardens.
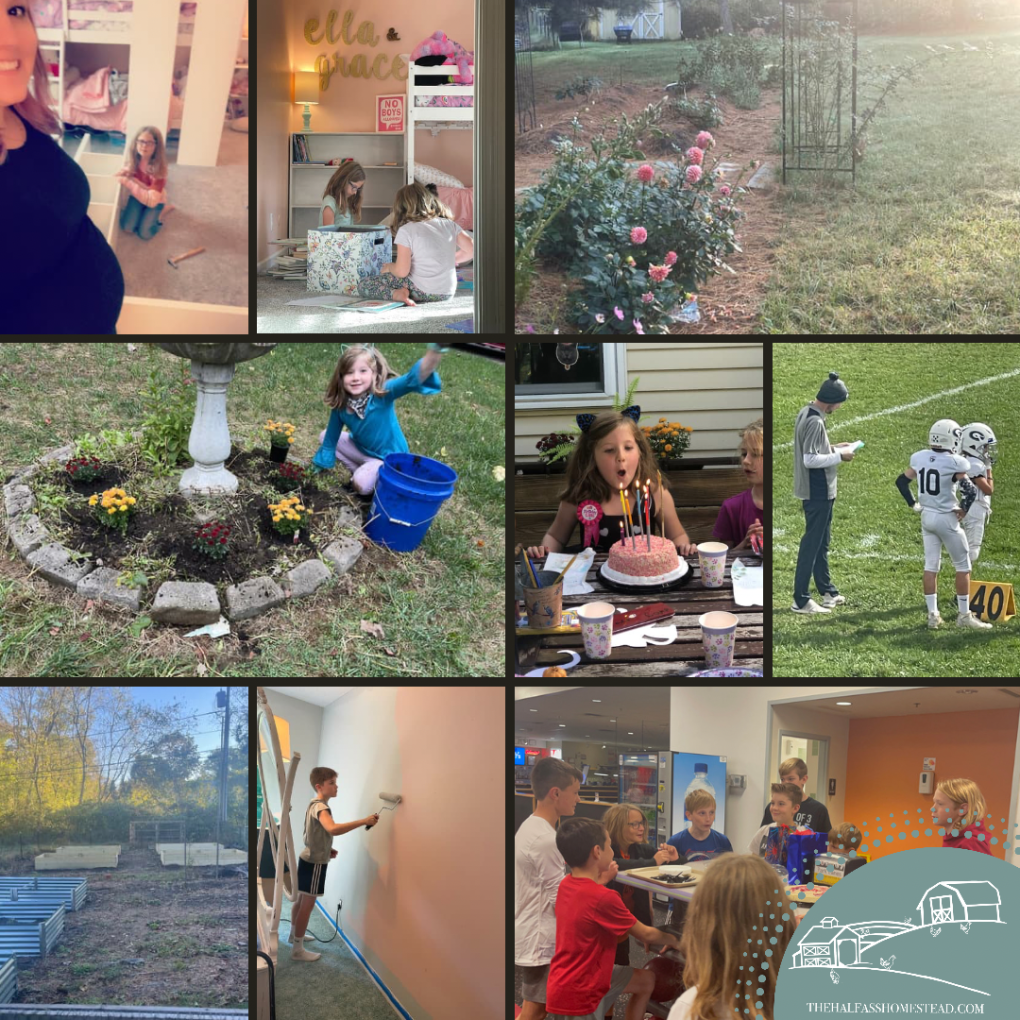
In the past month, we’ve waged war on the “mother-in-law’s revenge”–aka goutweed–in the front gardens, planted fall mums, orchestrated a near-whole house refresh with new carpet and paint in the majority of the house, revived the dahlias in the cut flower garden, celebrated 2 birthdays and an anniversary, finished the football season, and moved the girls into a shared room to free up a room for the nursery.

The big garden also got A TON of care and attention from Clint who built raised and installed garden boxes and used old pallets to build a new compost bin. I’m serious y’all, it’s impressive!
As the cool weather rolls in, we have much more to do–like prep the coop and gardens for winter.
I’ll be posting something about each of our updates and adventures moving forward. In the meantime, what winter prep tips do you have to share with me?!

Cut Flower Garden plan: Year 1
It’s almost here! Sun’s out, buds out y’all! Yes, sad attempt at a little gardening humor. Real sad.
Regardless, it’s warming up here and we’re only a handful of weeks from the danger of the last frost! I’ve got my bulbs waiting and little seedlings thriving indoors. A few weekends ago I spent the morning laying out the garden plan for the new cut garden.
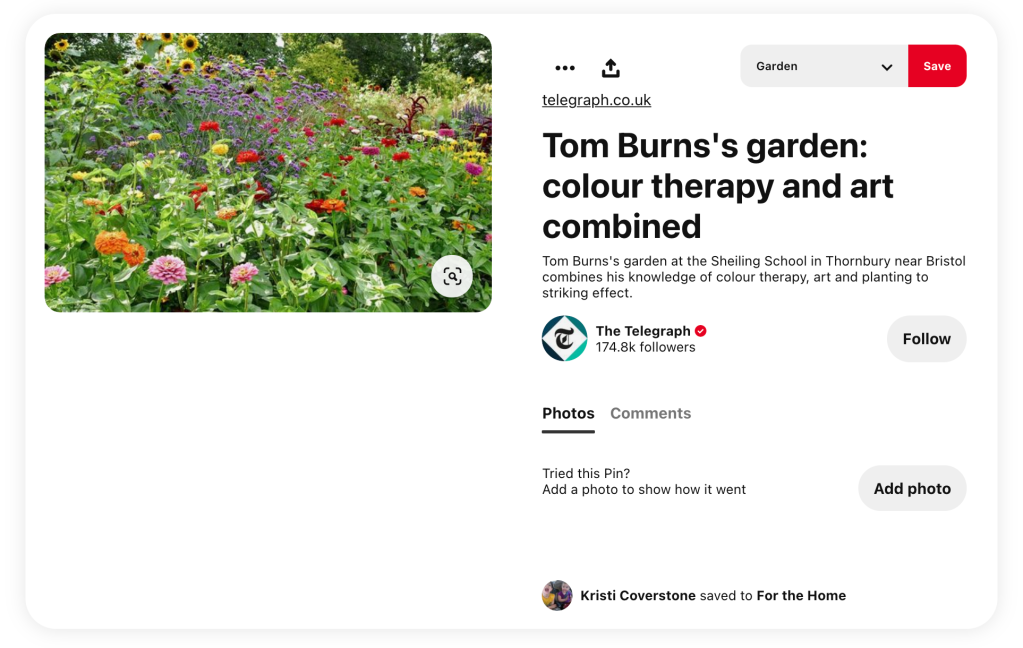
I decided that since I want my cut flower patch to not only produce beautiful bouquets for the house but also look beautiful in the yard–think cottage garden– I needed to think about what I put where.
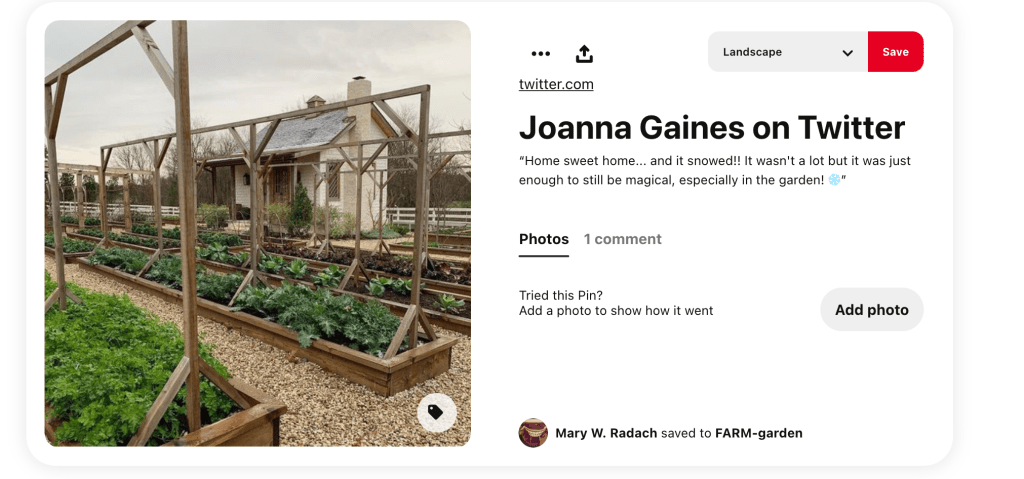
Inspiration:

This is where the teacher in me takes things a little far.
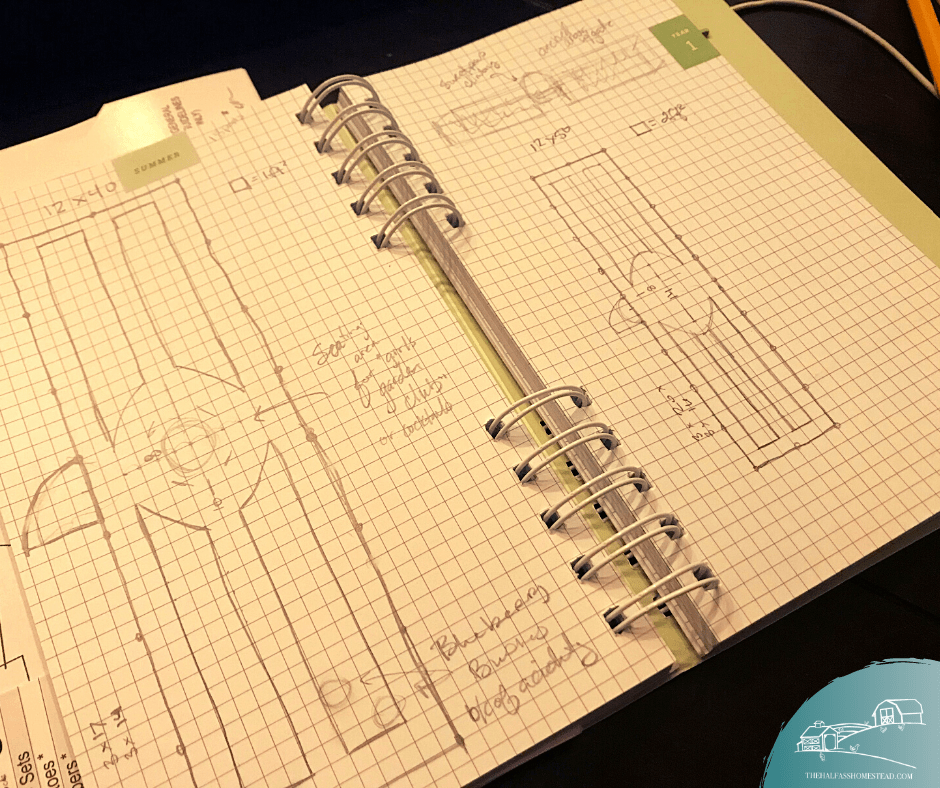
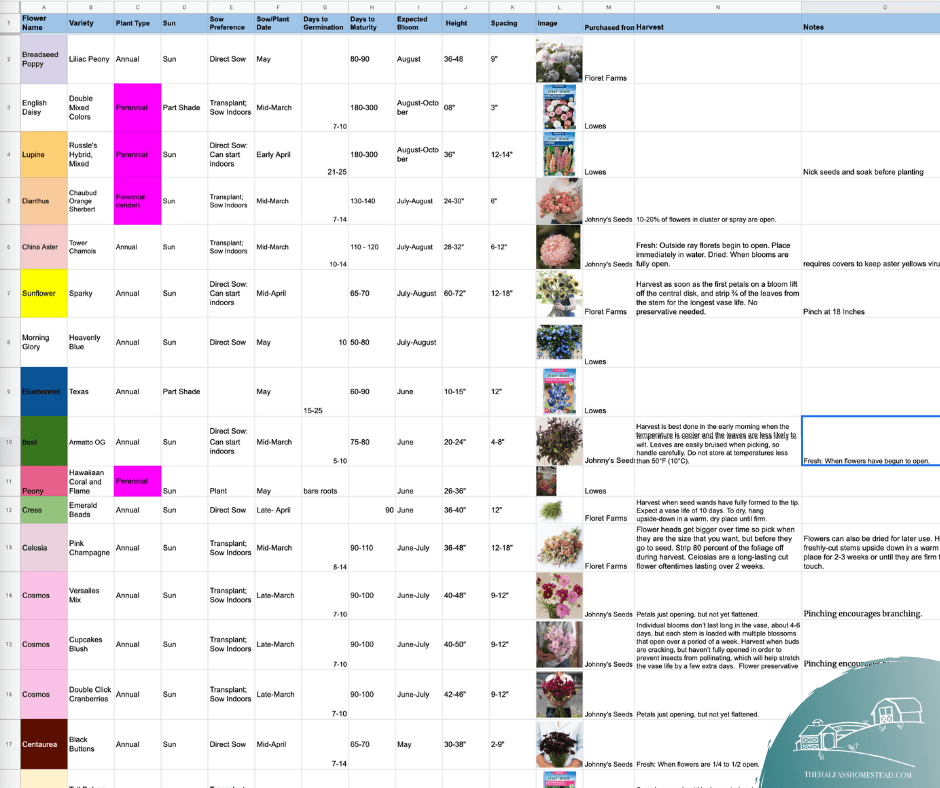
First, I decided I needed an info sheet for with all the basic information on each plant I’ve got for the garden, including planting/seed sowing preferences, bloom, height, and harvest time. This way I could determine where to place each plant so there’d be visual variety and plants wouldn’t overshadow their neighbors. I also added an image of each plant, so I could picture the adult plant and consider color.
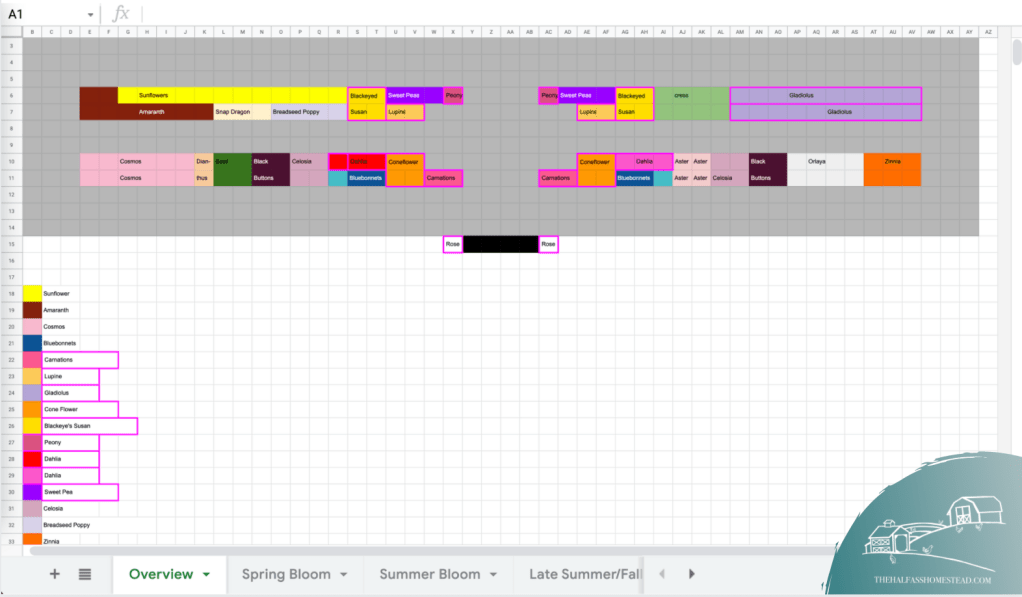
I then created another sheet with the layout, considering the height and spacing for each plant, and marked which plants were perennials–so I knew where plants would be coming back each year and where I’d need to replant. Finally, I created a layout with bloom times as I want to have something blooming in each part of the garden from spring to fall.
I know… overkill; but mentally I feel like this garden will be a piece of cake! I’ve thought of my plants from nearly every angle and will have no excuse for hesitation regarding which plant to put where. Now I just have to concern myself with the walkways and perimeter…. what type of fence posts will I invest in and will I do my walkways with mulch or pea gravel? 😱
Here’s some inspiration I’ve been pulling from:


This Week on the Half-Ass Homestead: March 7-13, 2021
This week was a busy on for me at work but in the back of my mind I all could think about was how I needed to get seeds started. I spent evenings in my newest book, In Bloom: Growing, Harvesting, and Arranging Homegrown Flowers All Year Round, and to say I’m inspired is an understatement. The pictures are beautiful and have me dreaming or a cottage style cut flower patch.
Last week I put in my request with 811 and got news that the entire side yard is clear! Unfortunately they didn’t inspect the back yard as I asked so I had to put in another request. I think this was due to the comment I made on the request that made is sound like I just wanted the back left side of the yard. Despite not having the rest of the back surveyed yet, I’ve officially decided where I’m putting the garden!

As I shared before, some of the pain points of the current location are that it’s too far from the how, and a water source. After some thought, I’ve determined the side yard is the best place for the garden – it’s close to the house, and the water hose, so I’ll be more likely to get out there and watering will be easier. And even better, it’ll be right in my line of sight while I work and paint from the sunroom! I watched the sunlight on the plot throughout the day to ensure it receives plenty of sun.

So this morning I got right to planning. First with the vegetables using my handy-dandy Clyde’s Garden Planner to map out what, how and when I can plant. I found it easier for me to visualize everything by making a chart with each month and a list of what would need to be planted indoors, outdoors, and harvested.


I did this same thing with my flowers and added the tasks to one of my new 5 year planners. Both planners have places to log information about planting and harvesting but I like the open layout of the of the Royal Horticultural Society record book.
After I laid out the scope and sequence of planting and harvesting times, I took a break to get the the girls shoes for Roseanne and Cameron’s wedding next week . On the way home we stopped by Lowes… I mean, shut up and take my money, Lowes! I not only picked up the landscape fabric I went in for, but I also came home with tulips (because the girls had to have their own tulips ), gladiolus (because they remind me of my Mom), peonies (my favorite), dahlias, and some evergreen trees to add a screening around the fire pit area.

When we got home, I went out to see what I had to work with in regards to dimensions for the side garden. Because we need to maintain a passage large enough for us to drive a truck in the back–for when we have mulch and gravel– I’ve got a maximum width of 12 feet but have a lot to work with regarding length. Rather than doing the traditional raised rows of 18 inches, I’m opting for 3 ft wide rows for more surface area to plant in – like a hybrid raised bed/raised row.
As I was showing the girls, they requested a sitting space for their “Girls Club”. The Girls Club was just started this week between the girls and Ava. When they meet they “take notes on nature” and have even requested a guided tour of the emerging plants in the house gardens. ❤️ They also plan to have art on Wednesdays, picnics on Thursdays, and show-and-tell on Fridays. With this adorable request in mind, I’m thinking I’ll opt for 40 or 50 ft and have sketched out a few plans.
Tomorrow I’ll spend the day planting seeds, marking off the side garden with landscape fabric, and maybe even moving soil.

This week on the Half-Ass Homestead: February 14-21, 2021
As we wind down from the Galentine’s Party last weekend (more on that from Ella and Grace soon), and we start to warm up from the winterpocalypse that froze much of our country, I can’t help but itch for springtime.
I mean, the struggle is real, y’all. Back in Texas, pre-2020’s anyway, spring starts NOW. My Mom already has most of her garden and plants in the ground with sprouts and buds everywhere. Yet here in the Midwest, it’ll be May before we are out of the freeze window. Again, I love it here and all the beautiful snow, but I think the socially distanced winter has kept me feeling cooped up a little too long this year. Or maybe this is a result of having garden success and wanting to bring my gardens out of hibernation. Either way, I’m looking forward to breaking soil, opening ALL the doors in the sunroom, and watching all the green sprout from the thawed ground.
This week I took the Cut Flower Garden Winter Mini Course from Floret Farms which I found out about after I ordered some seeds late one evening a few weeks ago. I bought Floret Farms’ beautiful Cut Flower Garden book last year after the girls shared how much they’d like to have a flower garden. For Christmas this last year, Grace asked for her very own flower garden… again, spring cannot get here fast enough! And this year I plan to be more prepared than ever.
We got a late start on the cut flower garden last year and planted nearly of the big garden with seeds sown directly into the ground. After I picked up the nifty Clyde’s Garden Planner tool, I realized there’s a lot I can start planting indoors as early as March!
As I took the Floret Farms mini course, I started filling up my Amazon cart and making garden plans. And for some reason Amazon felt it’d be cool to send it all in individual packages over several days (enter stare down from Sr. every time he had to grab a package form the frozen porch 😬🤣🤷🏻♀️)
Here’s what I ordered (not all pictured):
- 1″ x 6″ Garden Labels – to label my trays and young plants.
- Germination Station with Heat Pad -this may fit 72 plants but I feel like I need at least 2-3 more of these… is that crazy?
- Vermiculite – Floret swears by this for seeds.
- Organic Seed Starter Mix – self-explanatory.
- Portable Potting Trays – A potting tray may not seem like a necessity but now that I know such a thing exists, I think they are essential! I made a mess last year.
Non-Necessities :
- Gardner’s Tool Belt – Erin, founder of Floret Farms, has a cool tool belt like this. This one is a fraction of the cost and I may look more like a member of the Village People with this on than she does, but I will FEEL legit and that’s what matters, right? 🤣.
- 5 Year Gardner ‘s Log Book – Two things… 1) Purchasing a 5 year journal should show REAL commitment y’all! 2) This was MUCH smaller than I thought it would be but I like the seasonal checklists and todos.
- 5 Year Gardener’s Record Book – Um. I just realized I bought two 5 year books… I guess this one is more of a record book than the other
- Mini-Farming: Self-Sufficiency on 1/4 Acre – I mean, why not?!
Now that I’m armed with more knowledge about staring seeds indoors, have the right tools, and more gardner’s journals than one person needs at one time I’m ready to get a jump start on spring!
And if that’s not enough, I also got the privilege of sitting down to coffee with my mother-in-law and sister-in-law Mary’s soon to be mother-in-law to begin planning a late May backyard engagement party! Have I told y’all how much I LOVE to host things?


Dreaming of Spring and taking the recently released mini course from Floret Flower Farm tonight. I bought their beautiful book, Cut Flower Garden, last year which inspired a late season build of a small patch on the side yard. It was less than successful but I’m hopeful for a better outcome this year, especially since Grace asked for her own flower garden at Christmas.
