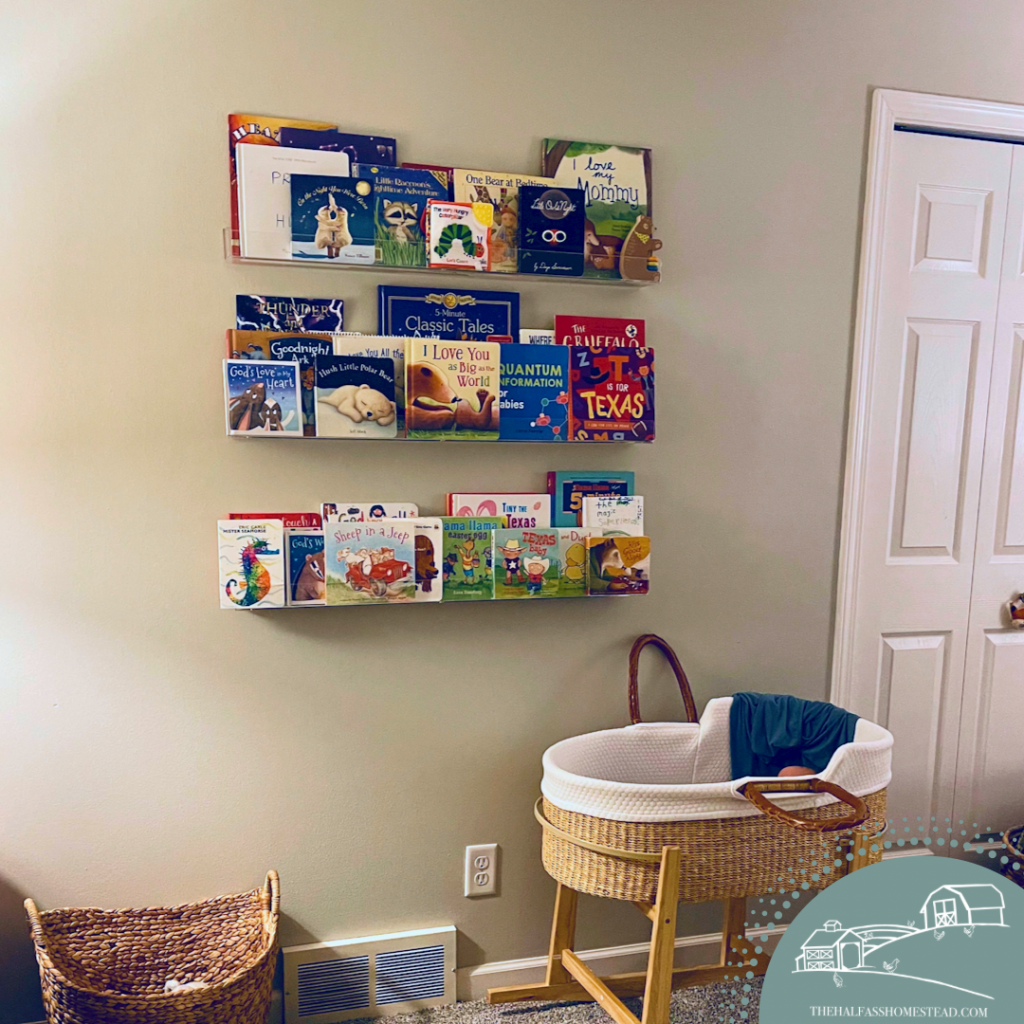
Y’all. This nursery has come along WAY slower than I would like. Partly because I either don’t have energy, can’t make a decision, or I’m waiting on someone or something. Anyway T-minus 23 days and it’s ALMOST done. Possibly the most exciting thing, these acrylic floating shelves for books.
I’ll tell y’all something, it KILLED Sr. to put those nine holes in the wall for these but I absolutely LOVE them.
Now on to the rest of the walls and finishing touches. And I cannot promise there won’t be more holes 😜
It’s a blistery, cold day here in central Ohio as the winter storm impacting much of the US this early February hits us. Also, Punxatawny Phil says it’ll be 6 more weeks of winter. So, what better time to share how we’ve prepped the henhouse for winter this season? While I’ve been meaning to write this post for a while, I also wanted to ensure our methods worked before sharing… just in case some of you look to our half-assery for guidance. So here it is…
This was the first year we had to winterize for chickens–our flock last year went to Gigi’s (Tarin’s mother) before winter. When the hens stopped laying eggs mad-fall, Gigi came by to help us see if it was something we were doing… it was. We learned that we weren’t letting the hens out early enough nor did the feed we had provide enough calcium for layers. And because we had no idea what we were doing or plans developed for how to brace for winter, Gigi offered to take the hens to her coop for the winter. Needless to say, that flock stayed with Gigi as the Norris’ welcomed their newest little one to the world and the idea of taking chickens back on was a little much for them this spring.
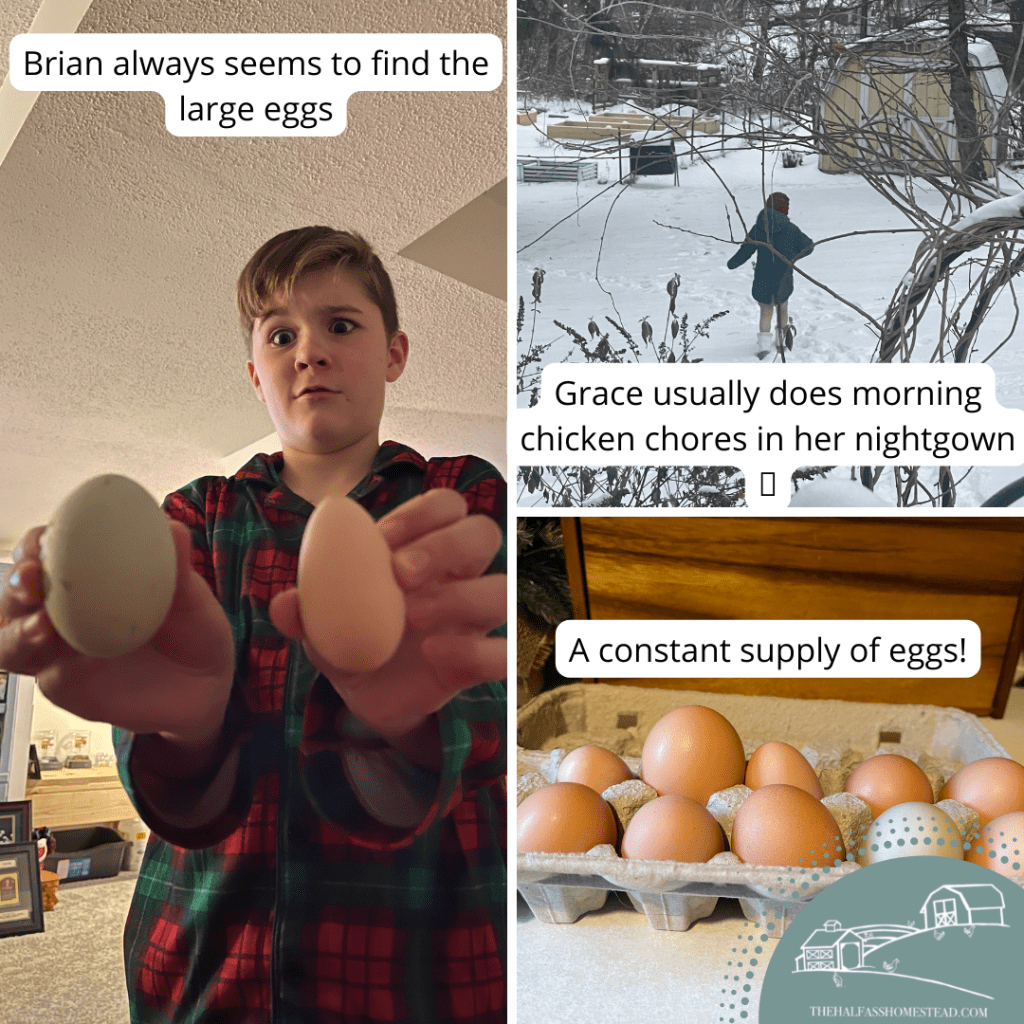
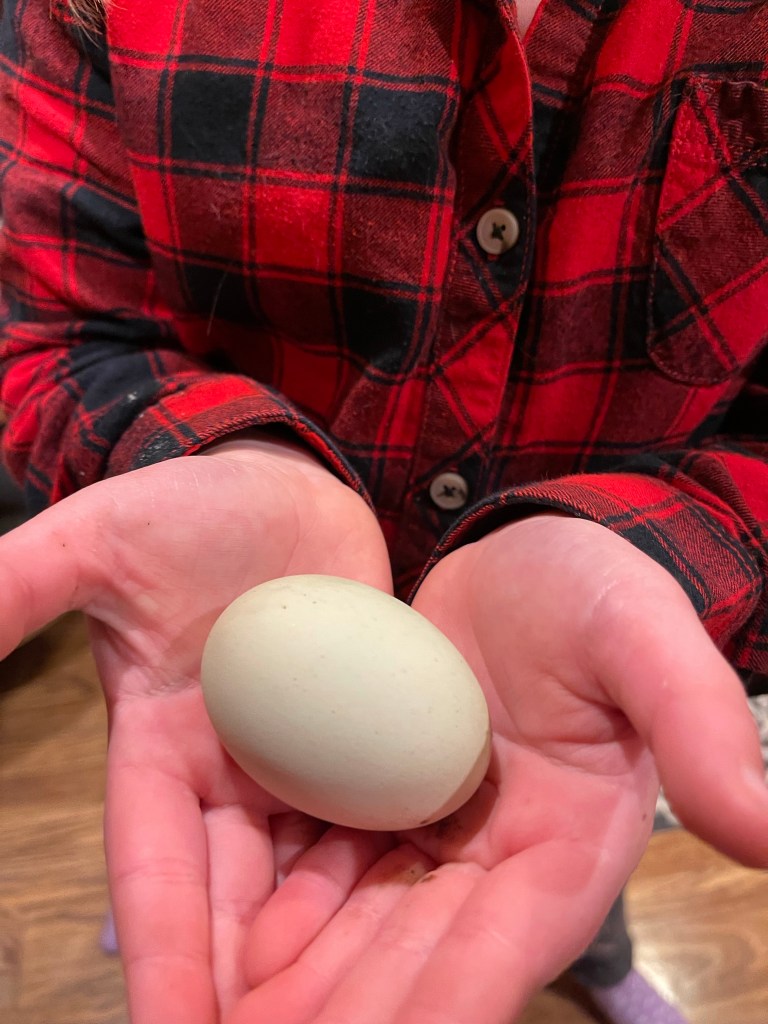
This spring, the Camp kids pleaded hard and presented some strong cases for getting chickens again. They vowed to help care for the hens every day–rain, sleet, ice, or snow (like the postal code goes). It’s been amazing to see them work together to care for the hens, though they need reminders from time to time. This flock has a few hens that are STILL producing eggs, which amazes me. While the adorable little coop we bought for the last flock is less than ideal for a number of reasons–difficult to clean, flimsy door, barely large enough for 8 hens–we decided to refrain from investing in a larger coop just yet for two reasons:
I wasn’t completely confident the hens, or really the kids, would last through the winter. This pregnancy has really sucked the energy out of me so the responsibility of keeping the hens alive has been soley on the kids and just supervised by Sr. and me. We fully anticipated the possibility of the kids throwing the towel in and needing to rehome our sweet hens.
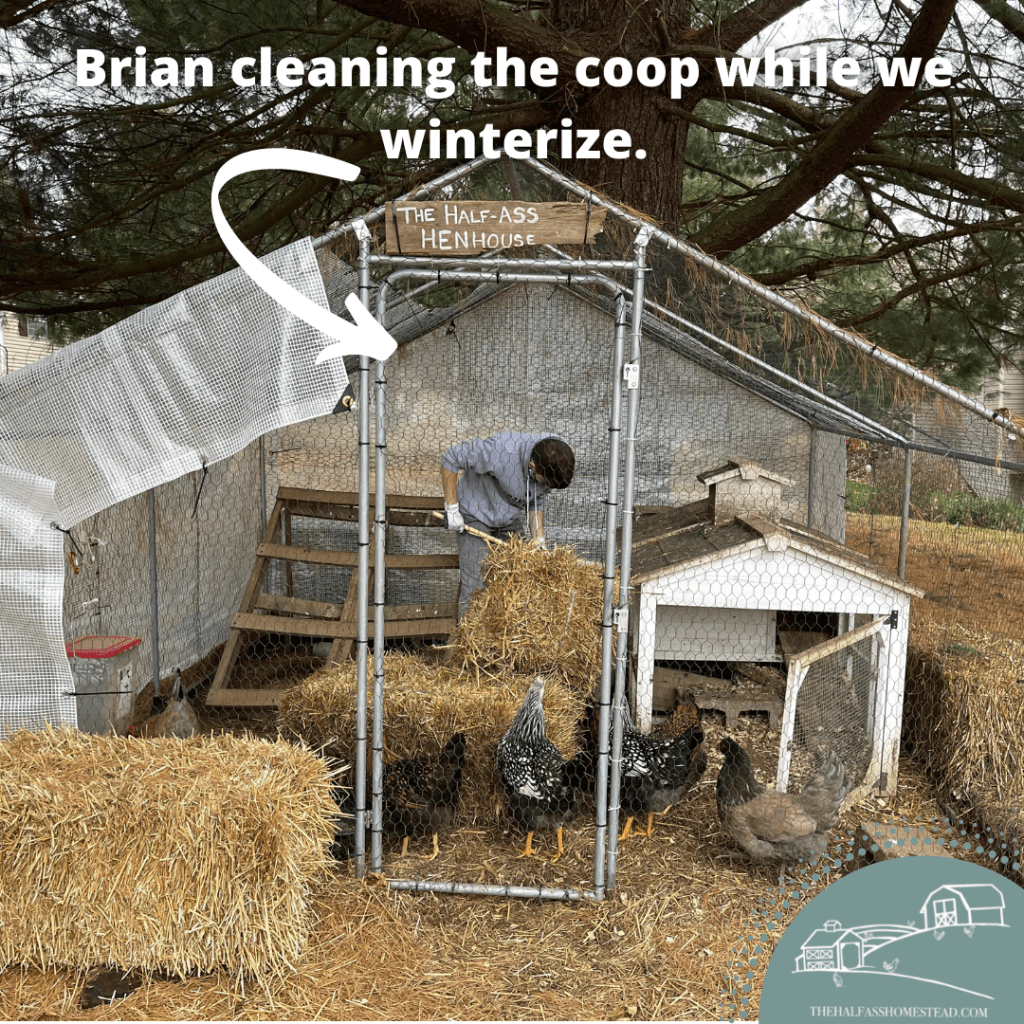
Our barely-big-enough coop actually seems to be an advantage in the cold winter while a larger coop might require more work to winterize. Our coop is designed for 6-8 hens, we have 8. But the tight quarters are actually a benefit as they keep the hens warm with less dead space to have to keep warm.
We’ve had some pretty cold, icy, and snowy weather this winter and the kids, hens, and coop continue to persevere. I’m glad we chose to wait on a bigger coop as the winter care experience will also help us determine the best coop feature we want when we upgrade in the spring.
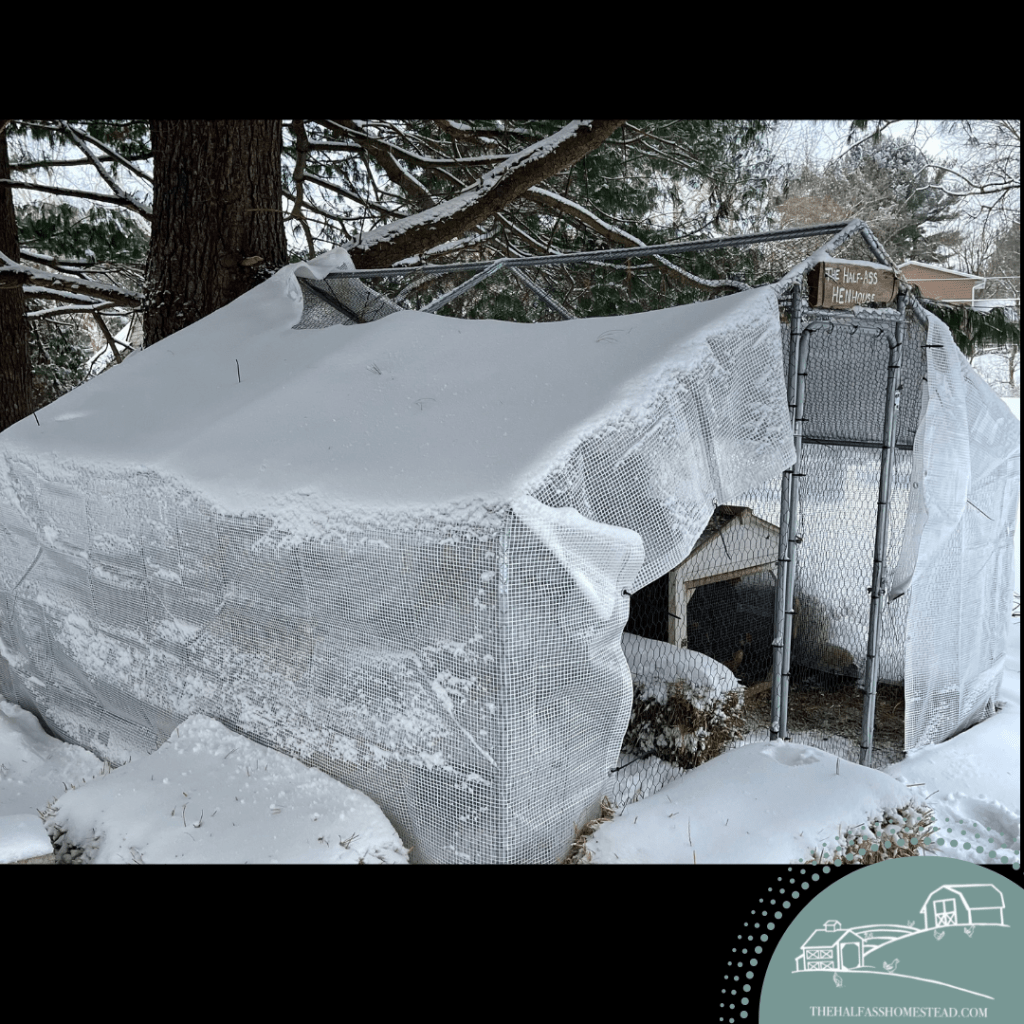
So how did we winterize this year? It was actually pretty simple and cost-effective! First, I did some research and came across the idea of winterizing the run by blocking the wind with clear tarps. Since our coop sits in the run pen, we determined that this would be a two-in-one solution!
I purchased four 8 x 12 clear heavy-duty tarps from Amazon. These would not only block the hens, and their coop, from blustery winds but also allow us to maintain some visibility in the run. We ran the tarps horizontally (with the 12 ft side across the walls of the run) and secured them with zip-ties. The sides of our run are less than 8 ft but the excess height of the tarps actually provide a little coverage from snow on the edges of the run.
We also purchased a few bales of straw to provide more insulation in and outside of the run. Inside the run, we placed two bales against the open side of the coop, which is placed in the corner of the run. Outside the run, we placed the remainder of the bales against walls. As we get snow and ice, we use straw from the bales to provide a dry pad and walkways for the hens to walk on and stave off possible frostbite. The only issue we’ve run into is, recently–because we don’t have our straw bales covered–they freeze and are next to impossible to break apart. We’ve just used our pine bedding on the floor of the run instead.
Speaking of bedding, we’ve upped how much bedding we use as well for the winter. This helps insulate inside the coop and maintains a dry space for our hens.
When it comes to water, we’re simply using a bowl of water, checking and refilling throughout the day, when the temps are low enough to freeze up our gravity waterer. I thought for sure we’d have a water warmer by now, but haven’t seen enough need to invest in one just yet.
Whether you come here for guidance, curiosity, or entertainment, thank you. And know we always welcome your questions and comments!
It’s another year of my favorite holiday appetizer! I’ll be making double or triple batches this season. Check it out below!
If you’re looking for an appetizer that’s sure to impress, you’re in the right place! This one’s creamy with a sweet heat and all the right holiday flavors. But I’m no food blogger so I’ll cut straight to the chase and give you the recipe… if you like a little story with your recipes, feel free to read the second half of this post for how this recipe came to be.
Cranberry Heat Dip
Prep Time: About 20 minutes
NOTES:
This recipe requires that you let the ingredients rest in the refrigerator overnight for the best flavor.
This recipe gets it heat from Serrano peppers, which are hotter than jalapeños (about 5xs hotter). Don’t worry, the citrus from the orange with the cream cheese cool it down. If you’re heat sensitive, you can try using less Serranos. If you’re a heat-weeny, you can sub them for jalapeños.
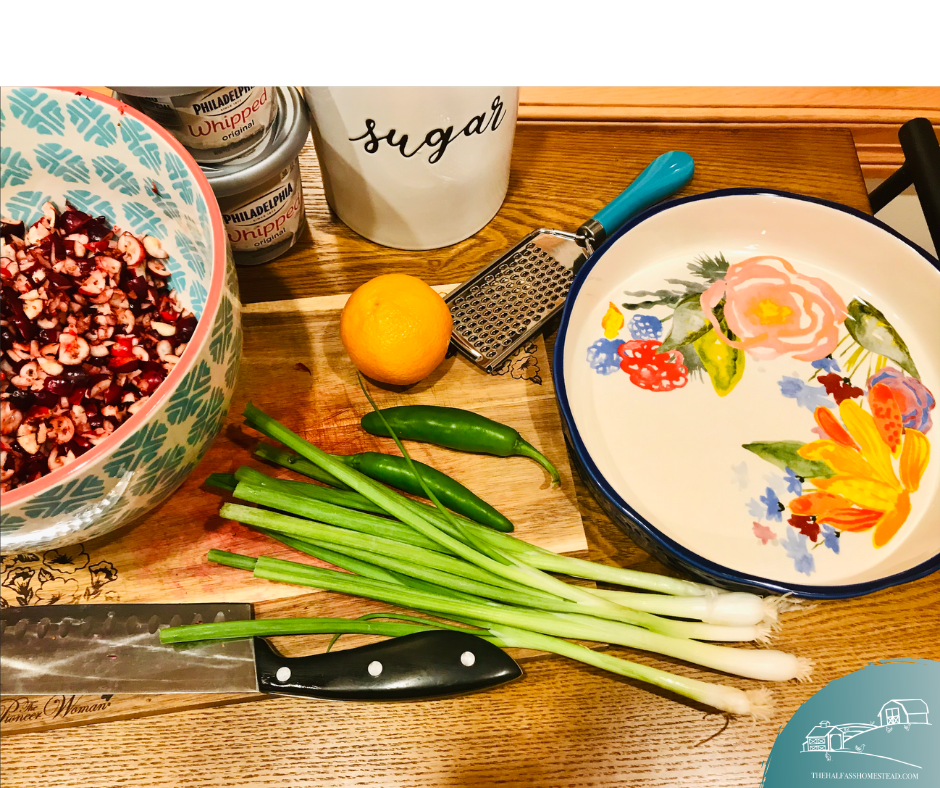
INGREDIENTS:
12 oz fresh cranberries, uncooked
2-3 Serrano peppers (depending on your heat preference)
1/4 cup green onions
1 cup sugar
1 orange
Pinch of salt
16 oz whipped cream cheese
Crackers (I like Triscuits or Ritz)
TOOLS:
Knife
A nice pie dish to serve your dip
A medium bowl
A spoon or rubber spatula
A zester (or a fine cheese grate will work in a pinch)
Colander
DIRECTIONS
Chop your cranberries. If you have never chopped fresh cranberries before, you’ll find these boogers can be messy. You don’t need to chop them all individually but you want to avoid any whole cranberries.
Dice the Serrano peppers and chop the green onions.
In a medium bowl toss in the cranberries, peppers, and onions. Combine the mixture with the sugar and salt
Zest your orange into the bowl then cut it in half and squeeze the juice into the bowl and stir well incorporated.
Cover and place in the refrigerator overnight.
The next day, remove the bowl from the fridge and give it another good stir.
Spoon the whipped cream cheese into your serving dish.
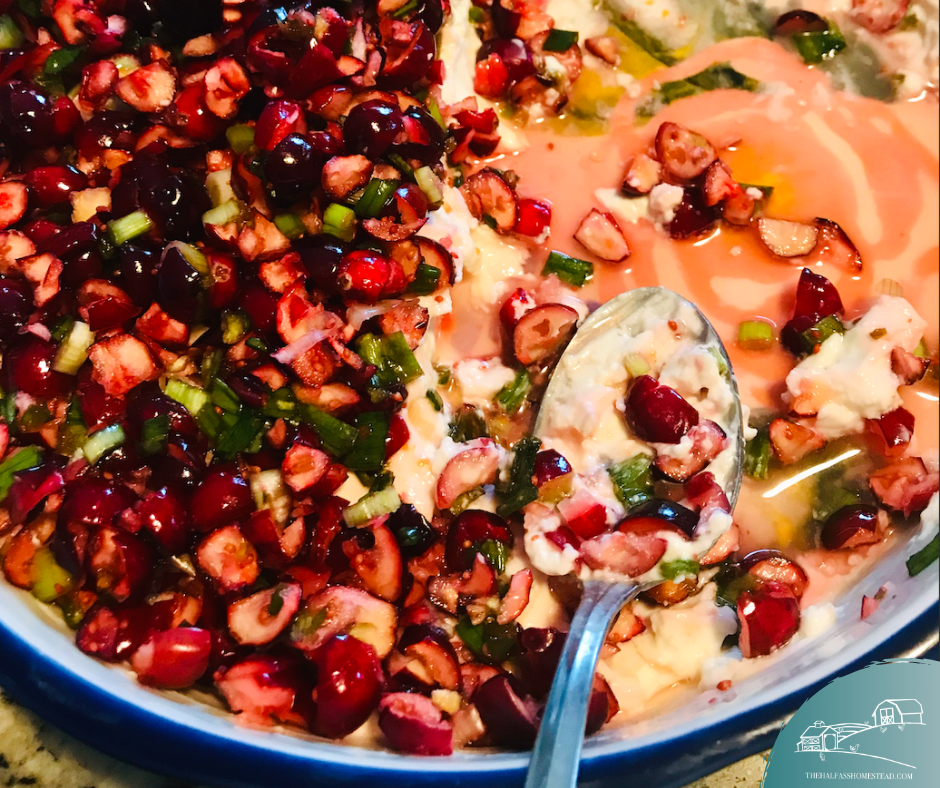
Pour the cranberry mixture into the colander to strain the excess juice.
Pour the strained cranberry mixture over your whipped cream cheese. Cover and put back in the refrigerator if not serving immediately.
Serve your dip with crackers and a spoon to help spread onto crackers.
Enjoy!
The Story
As we all know, 2020 has been one giant shitstorm. The impact of COVID-19 has lasted much longer than we all anticipated and has overshadowed the winter holidays. Despite celebrating much smaller than usual and a day later, we still planned to have the traditional dinner at Thanksgiving with a few family members. A few days before Thanksgiving we were invited to celebrate over dinner with our good friends the Sickles. Having the main, sides, and desserts covered, Rachel asked if I could bring an appetizer. Well, turns out I’ve never made an appetizer for a holiday meal!
So I did what anyone does when searching for inspiration… I hit Pinterest. This Cranberry Jalapeño Dip caught my eye so I had Sr. pick up the ingredients during a last minute run to the grocer. Sr. couldn’t find jalapeño’s so he brought home Serranos. My friend Carlos once told me that Serranos we much better than jalapeño, with better heat and flavor. To be safe I only used 2 Serranos, since they can be significantly hotter than jalapeños.
Additionally, we’ve been binge-watching the Kids Ultimate Holiday Baking Championships. So with the inspirations of great flavor pairings and Grace’s desire to zest every orange she sees like the kids on t.v., we decided to replace the lemon in the original recipe with orange.
This dip was a HIT y’all! The creaminess of the soft cream cheese, the sweet tang of the sugared cranberries and orange, and the slow heat of the Serrano make it pure joy. It was so good I let the Sickles keep the rest and made another dish the next day for dinner at our house. Sr. mentioned that it could be a but hooter so the second time I used an extra pepper and will use 4 the next time.
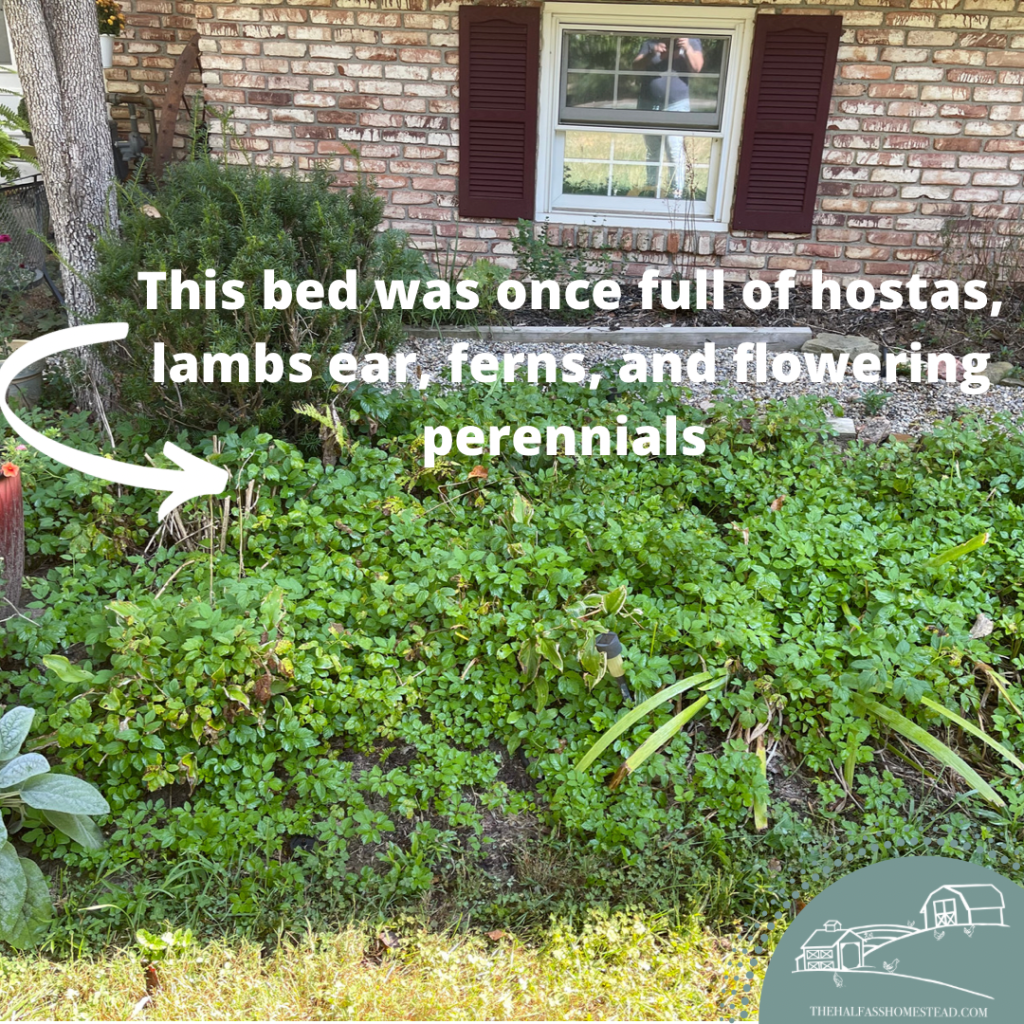
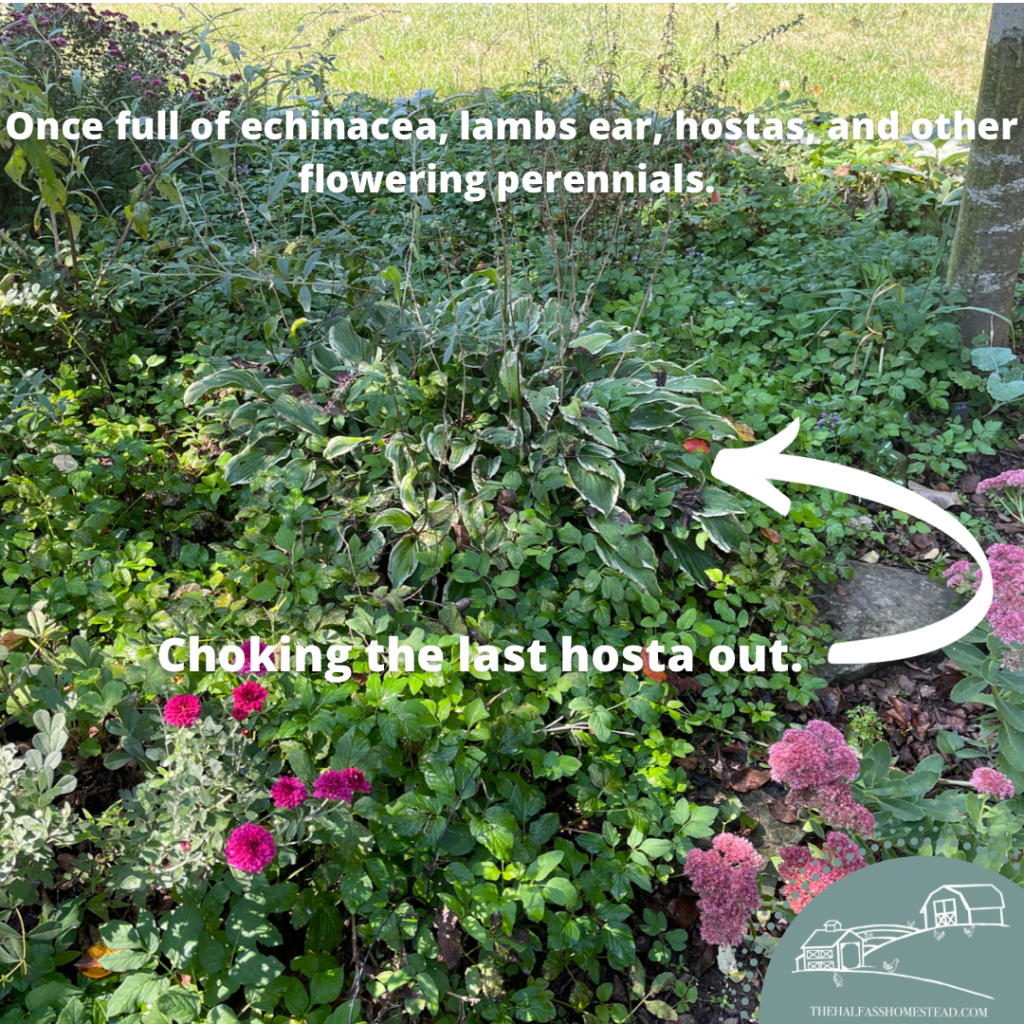
When we first moved in, Kay, the previous homeowner, came to pick up some mail and offered some gardening tips on how to care for all the beautiful perennials she planted in her 40 years in the home. One of the first things she said was that I needed to pull the “mother-in-law’s revenge” early and often.
What’s mother-in-law’s revenge, you ask? Well, Kay didn’t really know what it was but she named this formidable garden invader after her mother-in-law gifted Kay a few seedlings for her garden claiming they’d be the perfect filler and ground cover for her beautiful front gardens. Kay’s mother-in-law passed shortly after she planted them and said they’ve been haunting her gardens ever since. The seedlings quickly multiplied and choked out many of her strongest plants. She’s been pulling them from her garden–and cursing her mother-in-law–every year since.
Since making this our home and taking over the gardens, I too now curse Kay’s mother-in-law every time I have to weed it out of the gardens. It doesn’t just cover the open, available real estate on the ground, it likes to hide in the middle of other plants–like my hostas, chrysanthemums, and russian sage–making finding them early and pulling a bitch. And despite my best back-breaking, weed-pulling efforts, it seems to come back with more vehemence each time. I’m telling y’all this stuff could flourish in a vat of bleach with no light.
Finally, I did some research last year and discovered the real name of this pest–goutweed. Goutweed is an extremely aggressive, invasive perennial. Savvy Gardening calls it the “cockroach of the botanical world” and “a beast to eradicate”. While on the prohibited or restricted plant list in some states, goutweed can be found in some garden centers under the name of “bishop’s-weed” or even “snow-on-the-mountian”.
Turns out, Kay’s approach of pulling the plant, which often comes up fairly easily, is one of the worst things you can do! Goutweed stems from a web of rhizomes which branch far and wide underground. You see, rhizomes have a nasty habit of multiplying from broken or left behind roots in the ground–like when you pluck gray a hair and five more emerge, thriving and taunting you.
So how do you get rid of it? It’s a painstaking process. Many sites recommend fully covering it with plastic, essentially “cooking” the devil which can take anywhere from 8 weeks to 2 whole seasons. You can also smother it by cutting it down and covering it with cardboard and mulch – 2-3 feet beyond the menace’s prersence. Another option is spraying it down with a vinegar solution or even chemical-based weed killer like Round-up.
My initial plan was to try the smother and cover method. I figured I could cover around some existing plants and add good soil above, building up the gardens and planting new perennials which would look better in the front of the house than black plastic. Besides, I had PLENTY of cardboard thanks to Amazon and Christmas time which I stored for several months. Unfortunately, when we prepared for hosting my sister-in-law’s engagement party in May, Sr. wanted the garage clean and recycled all my cardboard. To be fair, I caved and gave him permission.
June is always a busy month at work and difficult for me to get in the gardens and then I was out of comission for several months with nausea in my first trimester. By the time I got back to life–and the gardens–in September, mother-in-law’s revenge had ravaged the front gardens.
Exhausted and over it, I’m not ashamed to say I finally caved and turned to the chemicals. After all, this was war. I came to terms with the fact that there’d be some casualties, like my russian sage, mums, and a few other perennials. After the first careful spray, I was disappointed that the beast didn’t begin to wither within hours. I had totally imagined a scene out of The Wizard of Oz when Dorothy douses the Wicked Witch with water and finally ends her reign of terror.
No such luck. However, after a few weeks a difference could be seen. AND my chrysanthemums didn’t die! Two more rounds of spraying and I’ve made a serious dent in the rein of Kay’s Mother-in-law’s revenge.
Unfortunately, the arrival of the cold weather has stalled my progress because the chemical sprays are recommended for using weather above 60 degrees. Looks like there will be more work in the spring. I’m thinking I may need to srpay again a time or two and then will likely cover with cardboard and fresh soil so I can plant a few new beauties. This will allow the new plants to thrive while the chemicals dissipate under the decomposing cardboard barrier.
I also haven’t touched the bed of hostas in front of the kitchen bay window yet but I plan to smother and cover that small bed. With my Japanese Maple in that bed, I don’t want to use any chemicals. Besides, the hostas are overgrown and can’t be divided because they’re infested with goutweed so removal or covering is the best option. I’ll cover it this winter and it’ll be fun to design a new perennial bed there in the spring–something that doesn’t have hostas maybe?
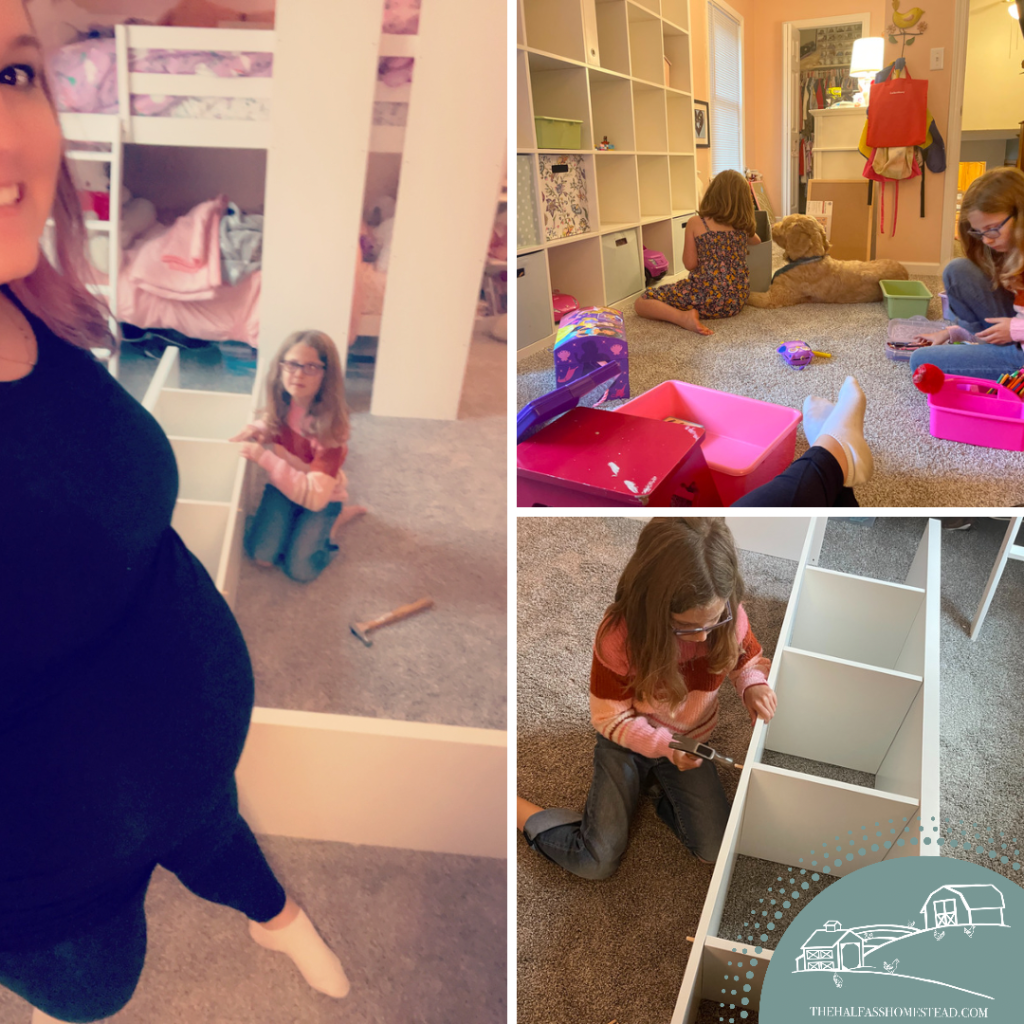
Last month we decided to do a BIG refresh to our home and replaced all the old blue carpet in our home. Y’all! There was a different kind of carpet (8 different shades of blue) in nearly every room and hallway in the house when we moved in. It was an eyesore–all stained from foot traffic and spills that had accumulated since it was put in some time in the 80s or 90s. It’s been a game-changer… and exhausting as we’ve packed away most of the house in 10 days, painted rooms and trim, and put it all back together after the install. One of the main reasons for the new carpet was so we could move the girls into a shared room and convert Grace’s old room into a nursery for our upcoming arrival.
Back in Texas, the girls–just 2 1/2 years apart in age–shared a room but when we moved to Ohio, each girl got their own room. Though they enjoyed their own spaces, they’ve often had sleepovers in each others’ rooms and occasionally discussed going back to a shared room.
When Grace was upgraded from a single twin to a twin bunkbed last Christmas, the sleepovers increased and so did the talk of “moving in” together. However, it wasn’t until we found out we were pregnant this summer, that the idea of moving them back in together was taken seriously.
The girls immediately began planning, taking over my interest to look for inspiration. Their only must-have–a play kitchen. Mine, plenty of storage to keep their abundance of toys OFF the floor and out of sight. I also wanted to find a way to show off their collections of hats, books, and stuffed animals as well as provide each of them their own special spaces.
It’s been a few weeks since the carpet install and we still have a little more to do but we’ve finally gotten to a place where we have something to show y’all!
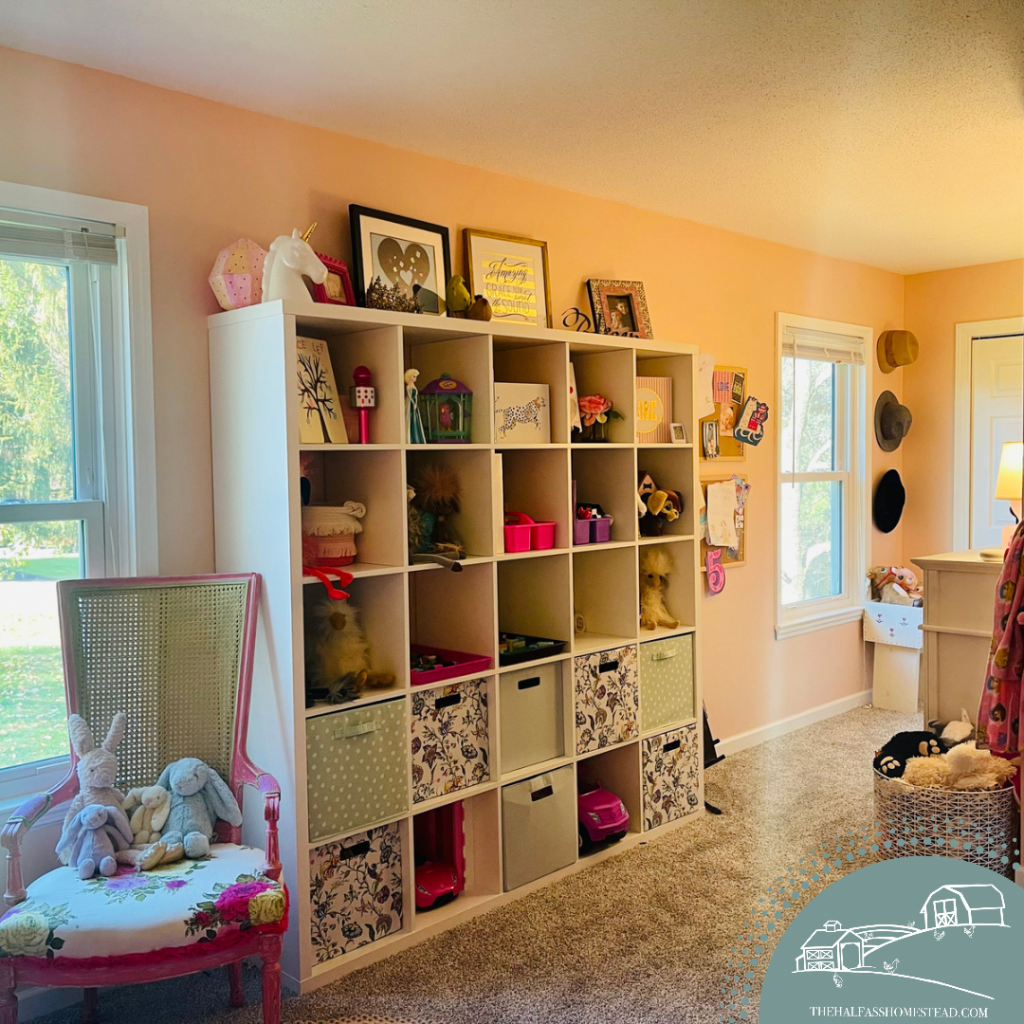
There are several different sizes and configurations of the Kallax systems. I actually went a size up from what I planned and I am so glad I did! It was also super easy to put together. Ella and I did it all ourselves and only needed Sr. to secure it to the wall.
New carpet was a GREAT motivation to go through toys and clothes but we still had lots to find practical solutions for. What I love about this unit is I can use bins to hide, I mean “store”, toys but we can also display special things at the same time. The bins also help the girls keep things sorted and easier to find. And the BEST part? The girls can easily move the bins to wherever they are playing and put them back all on their own. The toys have stayed OFF the floor since we set up the unit, so I call that a #MomWin!
Next up: the library and bunkbed. The girls both LOVE to read and had stacks of books everywhere in their old rooms–bed, floor, shelves… so it was important to make sure their bookshelf was easy to access and that they had a dedicated space for their current reads by their beds as well as good lighting. Last year, I got this three shelf bookshelf off my local Buy Nothing Facebook group and whitewashed it. By some miracle, it fits perfectly in the space next to the bunkbed.
The girls call it their “library” and Ella loves to sit right by the shelves and read. They also enjoy sitting in this beautiful, refinished vintage chair by the window. Truth be told, I tried to get rid of this a week ago, thinking there wasn’t room for it in their room. I finally got tired of it being in our dining room waiting for a buyer and put it here temporarily but it works out perfectly, so it’ll be staying!
That big red and white bear is named Wanda. She’s my favorite old stuffed animal from my childhood and now is graciously loved by Ella. We filled her with more stuffing this week to give her new life!
Since the girls like to do a lot of nighttime reading, I found them their own little wall bookshelves for their bunks at Target.
I also found these great little reading lights at Ikea to clip onto their headboards. The bunks are also each girls’ little piece of private real estate in the room so we added some special lighting and comfy pillows at the foot of the beds to add another space to sit for daytime reading. We reused the mosquito net canopy from Ella’s old room and Grace tszujed it up with a strand of floral garland we had in the basement. Each girl picked out their own lights while at Hobby Lobby the other day–llamas for Ella and an ombre curtain for Grace that looks so great with her canopy. These were around $12 each and are battery-powered.
Now that the days are colder and shorter, I foresee many hours spent on these bunks, with the lights aglow, reading. ❤️
Next up, the girls’ kitchen! As I mentioned, this was a must-have for the girls. They had many grand ideas for a custom build that Papaw and Sr. would have been obligated to create. Thankfully, we scored a well-built wood kitchen from the children’s room in our church when they decide to upgrade. I used Murphy’s Oil to give it a good cleaning but the plan is to paint it (when I have the energy).
I may also have Sr. build a simple base for it to make it a bit taller for my tall girls. The girls have their “fridge and pantry” stocked–mostly with homemade felt food, and a bin of larger cooking and baking playthings in the wall unit. They often play house and restaurant. The service is great, but a little pricey 😉
Lastly, Ella has quite the collection of vintage and straw hats–thanks to GiGi and Papa–and Grace isn’t far behind. For a few years, they’ve been stashed in the closet but we found some fun ways to display a few. the rest are in the dress-up bin in the wall unit. The hats on the wall are just hung with a simple push pin but I’d love to find some cool hat racks for a neat display with the rest of the vintage hats above their dresser.
All-in-all, aside from the cost of the new carpet the wall unit, two wall bookshelves, and bunk lighting, we didn’t have to buy anything else for this refresh–just some cleaning, combining, organizing, and moving!
Still to come for this room: window treatments– I personally LOVE these but Ella turned it down quickly–, bunk curtains for Ella to give her some requested privacy, possibly a new rug, and the painting of the play kitchen.
It’s been a few weeks since the constant nausea of my first trimester subsided–praise the Lord! Since then, I’ve been trying to catch back up to life and all the things around the house and gardens.
In the past month, we’ve waged war on the “mother-in-law’s revenge”–aka goutweed–in the front gardens, planted fall mums, orchestrated a near-whole house refresh with new carpet and paint in the majority of the house, revived the dahlias in the cut flower garden, celebrated 2 birthdays and an anniversary, finished the football season, and moved the girls into a shared room to free up a room for the nursery.
The big garden also got A TON of care and attention from Clint who built raised and installed garden boxes and used old pallets to build a new compost bin. I’m serious y’all, it’s impressive!
As the cool weather rolls in, we have much more to do–like prep the coop and gardens for winter.
I’ll be posting something about each of our updates and adventures moving forward. In the meantime, what winter prep tips do you have to share with me?!
Has it really been 3 months since we’ve posted?! Let’s just say life got pretty busy this summer.
June had us going in every direction for baseball. Work was also crazy as we added two new hires and put on our 2nd annual summer conference for educators. I didn’t have much time to get out in the gardens though there wasn’t much happening in the gardens. Surprisingly, my bee balm didn’t return this year. I’ll need to research why this happened though I think it may be overcrowding by lemon balm and the cleome spider flowers.
But as the summer heat began to roll in come July, we got some exciting news about a surprise that has prolonged my absence form the gardens, and almost everything else.
We’re expecting Camp baby #4! Baby Camp is expected to arrive in mid/early March!
Though this pregnancy has been the roughest, with 3 months of queasy nausea–something I never really had with pervious pregnancies–we’re all so excited. Grace is beyond excited, praying for a girl and constantly giving belly kisses. Jr. is praying for a boy and no longer being outnumbered by girls, and Ella is the only one that has said she’ll help change diapers 🤣.
With all the nausea, I really haven’t been outside much as the heat makes me feel awful, so does reading, driving, the smell of just about everything–poor Sr. has about 7 new deodorants he can’t wear because I can’t stand them and he’s running our of options 🤣🤷🏻♀️.
I’ve been so thankful to the Norris family for taking care of the big garden and bringing us harvests as they get them. Clint has gotten so into it all, he’s taking over the design and early prep for the garden for next year, more on that in another blog.
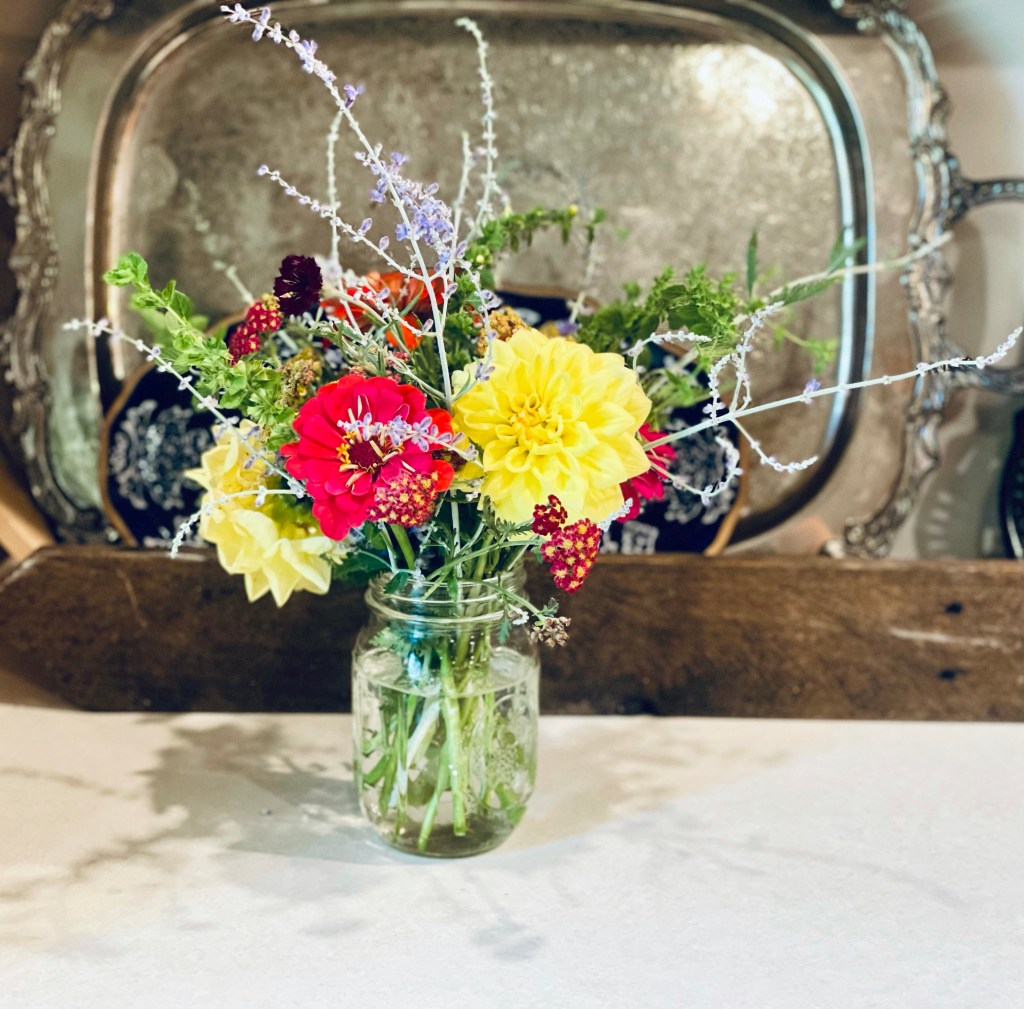
My MIL Becky has also been helpful and either pulls weeds or clips blooms for a vase every time she comes over. Check out this bouquet she took home a few weeks ago:
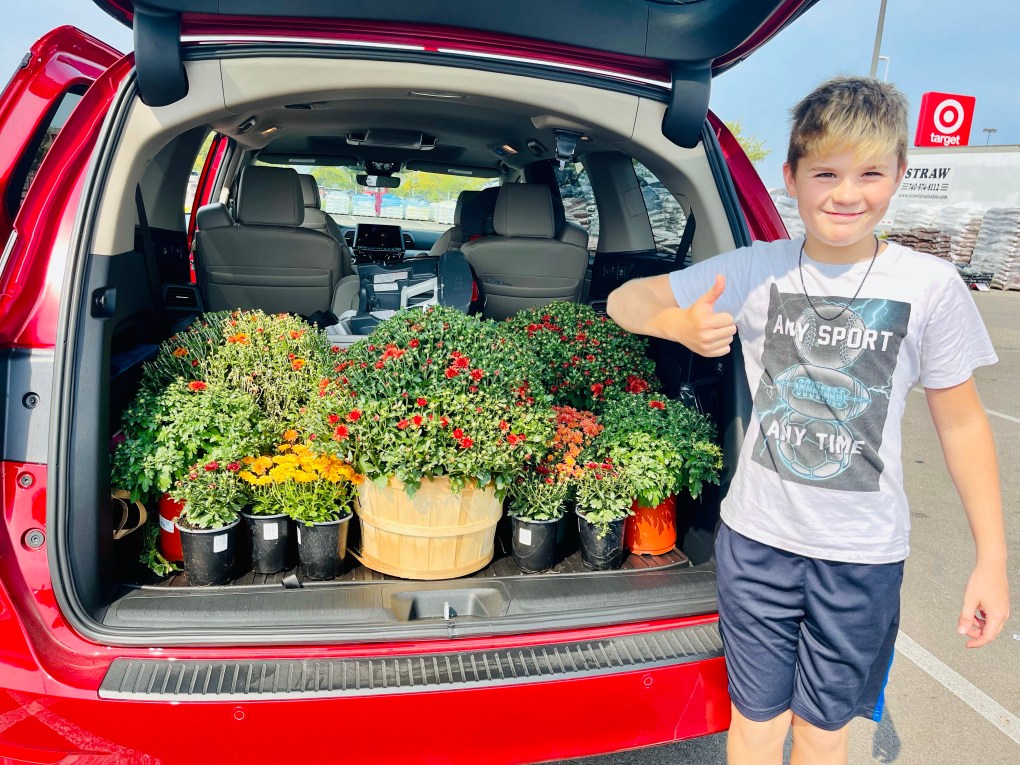
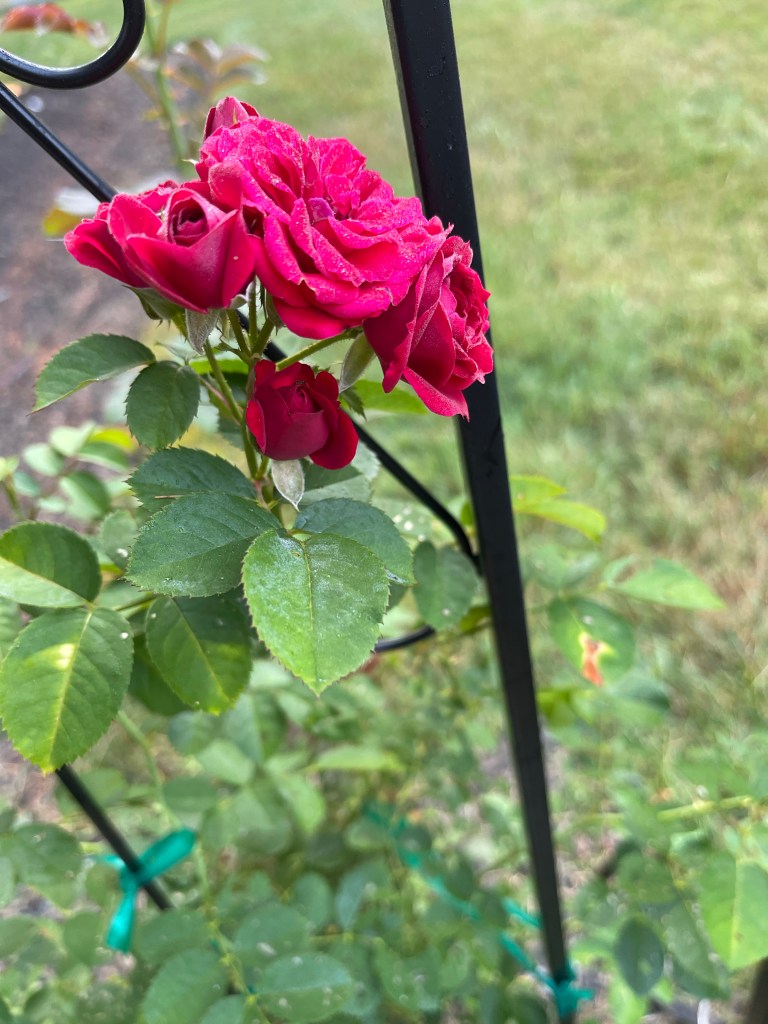
This week, I enter the 2nd trimester and hopefully the nausea subsides and I can get back outside. I’m itching to work on the house gardens and fill the porches with mums–my favorite. I’ve taken a few pictures the few times I’ve been outside this summer of some of the blooms I’ve found. The Cherry-frost climbing roses are about as tall and me and the zinnias are blooming away in the cut flower garden. My gladiolus bulbs must not have been planed deep enough because they shot out leaves but no floral stems and the wildlife has enjoyed my sunflowers (they new got higher than a foot), most of the cosmos… and eventually the dahlias. I did manage to make a few bouquets in early August and have plenty of zinnias to make more. Next year I’ll have to create either a greater barrier or pick more animal resistant varieties.
So excited to continue to share our journey with y’all!